![]()


I’ve been super distracted lately trying to get the next-gen star tracker project tidied up. And while I’m writing this brief post, I can hear the melodic hum of my 3d printer drawing out a new L2 Ring gear. It’s taking a lot longer than expected, but I’m having fun working through all the challenges. But imagine my surprise yesterday glancing around and not finding a single cloud in the sky. I was almost totally unprepared for this! So I grabbed Gamma off my shelf and got ready to head out. My goal was simple – develop a manual focusing routine in N.I.N.A. for my Samyang 135mm. Oh, and of course, maybe take some photos of M51.
Focusing Challenge
I started learning to use N.I.N.A. a little while ago and I’m committed to getting the most out of it at my level of the hobby. And that’s the rub. It’s clear that N.I.N.A. excels at integrating all kinds of imaging equipment in an efficient and automated way. Looking ahead, it’s exciting to see what I have to look forward to as I grow my skills and gear. But what can N.I.N.A. really offer to someone like me who is still, for all intents and purposes, just getting started? And that is really the question that drives my interest in this tool.
What I’ve struggled with right out of the gate with N.I.N.A. is focusing my Samyang 135mm lens. This isn’t necessarily due to any deficiencies in N.I.N.A., but rather my understanding of how to use N.I.N.A. towards that end. Being a creature of habit, I focus my setup in a very specific way. I can accomplish the same, and perhaps more in N.I.N.A., but I have to learn how to do it differently. And if I can’t formulate a new manual focusing routine in N.I.N.A., it’s kind of game over. Thankfully, that is not the case though.
Before outlining my initial draft of my focusing routine, I’ll just mention that – yes, I’m still planning upgrades to my Samyang 135mm Focuser that will allow me to take advantage of the autofocusing tools in N.I.N.A. I’ll do this via a custom ASCOM driver and a very minor HW upgrade on the focuser itself. I’m sure once I get this done, having a manual focusing routine when using N.I.N.A. won’t really matter much for me. But I also think it’s important to prove that N.I.N.A. is a tool that can be embraced by wizards with drool-worthy setups and newbies with a DSLR and tripod alike.
Manual Focusing Routine in N.I.N.A.
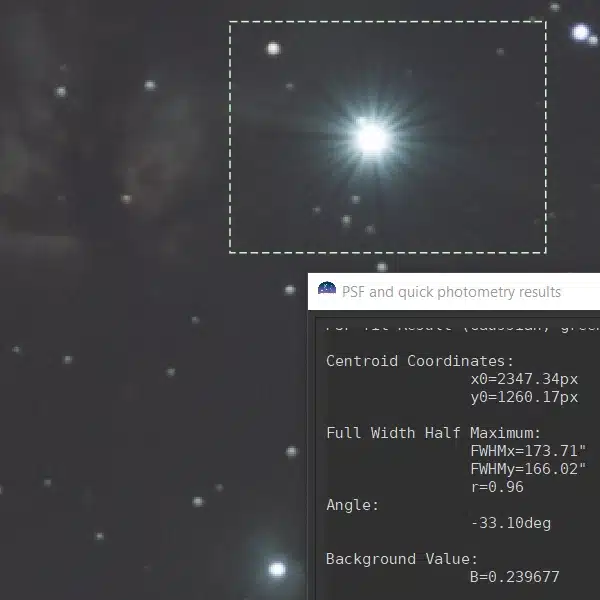
In the Imaging tab in N.I.N.A., there are two options for my Canon Camera: Liveview and Snapshot. Up to this point, I was attempting to focus by using Liveview. And this was a poor choice for a number of reasons. First, if you aren’t tracking, your focus star is constantly moving. Second, the Bahtinov Analyzer tool just goes bonkers trying to actively solve a constantly changing target. Finally, the target star will be quite faint in Liveview making it difficult to keep tabs on. Focusing using snapshots, on the other hand, eliminates or mitigates most of these challenges. And after playing with the Three Point Polar Alignment tool, I’m comfortable making changes to my equipment after my exposures load.
So here is my new manual focusing routine using N.I.N.A.
- In N.I.N.A., navigate to the Imaging Tab.
- Using Liveview, frame a bright star for focusing.
- Start tracking – Please note, you do not need to be precisely polar aligned at this point. This just helps keep your target star in your frame longer.
- Bring the star into rough focus
- Mount the Bahtinov mask on the lens
- Close Liveview and set the following camera settings in the Imaging Tool
- Exposure time – 1 second
- Gain – 12800
- Loop – ON
- Save – ON
- Click the Snapshot button and wait for the first image to load.
- Click the Bahtinov Analyzer and drag it over the target star
- Zoom in on the target star and resize the Bahtinov Analyzer accordingly.
- Adjust focus until you drive the Distance error in pixels as close to a minimum as possible when measured by the Bahtinov Analyzer.
- Stop taking Snapshots and remove the Bahtinov mask.

I just realized as I’m writing this that I can probably improve on this further by calculating the pixel size per step of my Samyang 135mm focuser. Then rather than iteratively sweeping back and forth in steps, I can roughly calculate how many steps off-focus I am based on the Distance error. Hmmm… Looks like some maths in my future before I head back out. Cool!
Nice Weather – Will Shoot!
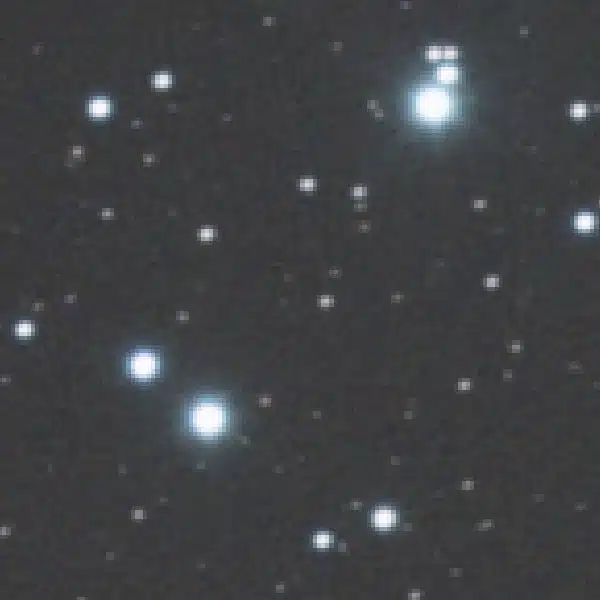
So what to do after figuring out how to manually focus? Well, take some pictures! The moon is quite annoying again and there is a bit of wind. But I’m not going to let the first truly clear night in weeks slip through my fingers. M51 is nearly directly overhead which makes for an easy target to frame up. So that became the plan. Now, I still have a lot to learn with N.I.N.A. in terms of optimizing the exposures of my images. However, for right now, I’m just going to go for 30-second exposures at f/4 and an ISO of 800 to be safe. Looking ahead, I can now begin to work on the rest of my astrophotography process in N.I.N.A. and optimally tune everything. But for my time this evening, here is a cropped in view of M51 with my Samyang 135mm, well-focused lens.

OK, it was fun to be outside again and have the opportunity to take some photos again. I hope the weather has turned and we’ll be seeing many more of these nights ahead. All the more reason to really buckle down and get the next-gen star tracker finished. And then the focuser. And then – yeah, you get it…