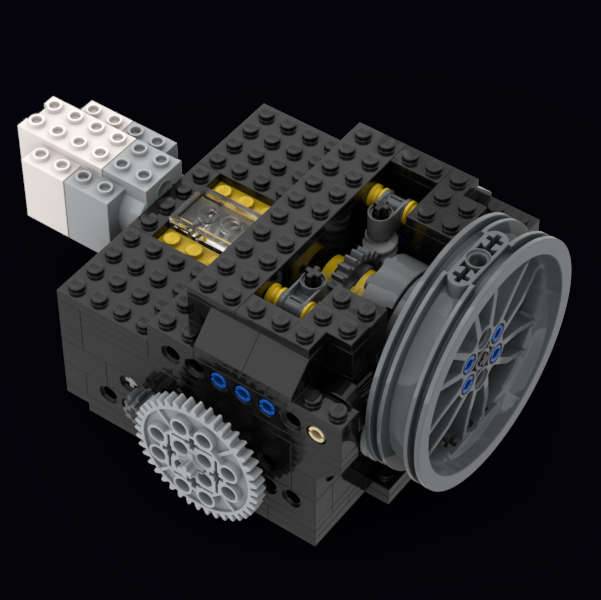
I had every intention of posting about the new 3D printed leveling platform for the Lego Star Tracker, but since a couple of people have asked, I’m going to go ahead and post the build instructions for the Lego Star Tracker Version 6. This was the first time that I’ve created instructions in Studio 2.0 so these aren’t the prettiest, but they’ll get you through this build. So without further ado, here are the build instructions for the Lego Star Tracker Version 6.
Before You Go Crazy
Listen. Seriously. These are Legos and Legos were not designed for this purpose. Before you go loading your very expensive camera gear on a rig like this, take whatever necessary precautions you deem necessary. I’m not responsible for any damage that arises from your use of these instructions or any Lego camera mounts that you build inspired by these instructions. I did have one mishap with this project as you may have read in a previous post and frankly, I was lucky.
I’ve been loading and testing this device at around 1.25kg or just under 3lbs. That is a Canon EOS 250D with the Canon 50mm f/1.8 lens (total 600g), the 1/4-20 threaded rod, ball head, and counterweights (~400g). I personally won’t go any heavier with this rig. I’d love to, but I don’t think it would hold the weight and I’m not curious to point of figuring out at what load this device would fail.
Point is, build and use this design at your own risk.
The above build instructions are free and provided for informational purposes only. Feel free to share and distribute – attribution would be appreciated. These instructions are not to be sold – this defeats the whole purpose of sharing this interesting project which I hope will spur new ideas.
For the Brave Who Pursue This Project
Once again, if you have to choose between buying Legos to build this or buying a commercial star tracker – seriously, buy the tracker. I’ve demonstrated that this project works (surprisingly well actually), but it’s not going to deliver results that are going to match what you will get from a properly designed piece of dedicated astrophotography equipment. So please don’t expect more than is warranted with this project.
Ok, I think I’ve tossed enough warnings out there. If I haven’t deterred you yet, I assume you’re a brave soul who is going to take the plunge and build this – or something like this. Very cool! Let me share a couple of notes that may help you along the way.
- Legos are more flexible than you may think. When loaded, there will be some minor bending and shifting as the center of gravity of the load changes. This is not a concern as to failure. But this will be visible in your photos as the stars will drift a small bit – even though the tracker is tracking.
- You have to balance the device in such a way that the gears remain constantly engaged. This is perhaps one of the more frustrating features of this project. Point is, there is a very small sweetspot of balanced operation. It may take you a while to zero in on where this is but will come with persistant use.
- I’ve found that starting the device with the camera positioned between 12 and 1 O’clock when directly facing the device yields the best results. You want it to start beyond its perpendicular position because of the slop in the gears.
- Friction is your worst enemy – even with the wheels to support the load. These are Lego wheels, not bearings – so there is still quite a bit of friction in the system. Not enough to keep the device from working – but enough that you’ll see inconsistent results photo to photo. This makes balancing the load especially important.
- I perform most of my tests at 60 seconds. I expect the best and most consistent results are going to come with 30-second exposures.
- Changing the position of the camera and focusing are a bit of a pain. It’s just something you have to figure out how to manage.
- Keep your batteries charged. Enough said 🙂
- Stopping down your aperture will yield better results – ie. sharper stars. I’m running most of my tests now at f/4. Keep a lazy eye on your histogram to determine the best ISO to select. I find that 800 has been working well for my tests.
- Polar alignment is tricky. You’ll have to find a solution that works for you. I’ve written about a number of ways that I use to reasonably polar align.
- Provide a sturdy level platform to operate the tracker. I may write a follow up post that provides instructions for the Lego base that I’ve designed. Stay tuned.
- Have fun, stick with it. You’ll be frustrated, but I promise it will be fun as you overcome the various inherent challenges with a project like this.
Lego Star Tracker V6 Build Instructions Final Comments
This is a project that I am absolutely going to continue to use – hopefully, more so when the weather gets a tad bit warmer. I’m also going to experiment with printing some custom pieces to tackle some of the shortcomings of using Legos. But as I previously mentioned, it was important for me to demonstrate this was possible using standard Legos (camera mount aside). And no Legos were harmed in the making of this device!
Once again – have fun with this. I know I have. And I hope you appreciate the Lego Star Tracker Build Instructions provided in this post!
Questions, suggestions, and comments are always welcome. If you think you can design a better Lego only-ish solution, give it a whirl. And please do share your own creations!
