![]()


I had a tough time deciding what to write about for this post. And this is a good thing because I have several things to write about! But, rather than try to cram all my updates into one post, I thought I’d stick to one topic and of course, I’d like to write about the Lego Star Tracker as I was able to get out a couple of nights ago for its third test. While there are still some things to work on and it’s a bit fidgety, I’ve seen enough to call this project a success. I’m declaring that the Lego Star Tracker is a working DIY star tracker.
Preparation for Test 3
I suppose that we really should call this version 6.3. There were a number of tweaks that I made with the tracker before heading outside. I was a bit nervous because the weather has been a fickle beast and while it was clear, it was pretty cold. If anything goes wrong, it’ll be difficult to determine if it’s the conditions or something that I’ve changed. But time’s up and it’s time to put this tracker through its paces.
I’ve had plenty of time to study this device inside. I can see that this device still has some balance issues. But I can also see that the 3D printed mount has gone a long way to minimize the balance impact. Short of designing and printing a new mount that I can balance front to back, this is as good as it’s going to get. The balance issues are within acceptable tolerances. This can be further mitigated in the field by wisely choosing my target in such a way that keeps the device relatively balanced.
The Last Remaining Issue
However, a new issue popped up during my study. And this last issue has pushed me about as close to waving the white flag of surrender as any. Friction. I’ve solved stability. I’ve overcome balance. I’ve refined my polar alignment strategy. But the one issue that I have the least amount of control over is friction. With Lego pieces, there is only so much I can do.
I stripped off a couple of the pulley wheels to eliminate friction with the axle. Then, I stripped off the back short round plate to ensure there would be no contact in the back of the cradle. I supported the worm gears underneath with lift arms to keep them in the optimal position. After looking everything over very thoroughly, I was satisfied I did all that I could.
Reflection
As I waited for the stars to poke through the clear evening skies, I reminded myself that when I set out on this project, my goal was to build a working DIY star tracker with Lego bricks. It would have been silly of me to expect perfection from this device. But I wanted to push the use of Legos as far as I possibly could. Clearly, Legos are not designed to be used for projects with the tolerances that I require. But that’s what makes engineering fun. It’s not a question of if I can build a working Lego star tracker, but how good can it be.
I’m sensing that I’ve nearly arrived at my goal. And I’m beginning to see just how good this device is, for what it is. So I’ve experienced a little bit of a flood of thoughts about what’s next? Well, let’s see how the field test goes, and then I’ll have more to say about that.
Time for Test 3
I should mention that I actually printed a new leveling platform for the Lego Star Tracker to replace my previous design. My concern about balance and stability got the best of me. So I spent the previous day printing a new platform that opened up the triangle and provided a wider base. It’s much more stable now and I can confidently say that I don’t see this version being prone to tipping over. I’ll share more about this in my next post.
I used the Polar Align Pro app to get my polar alignment set. I find that I need to reorient my phone often to keep the compass pointing North. There is a lot of metal near my phone and the fields from the camera, Lego motor, and the computer don’t help. When it sits too long, the compass drifts east towards the tracker. So as long as I work quickly after I reorient my phone, I can dial the alignment in pretty well.
Target and Camera Settings
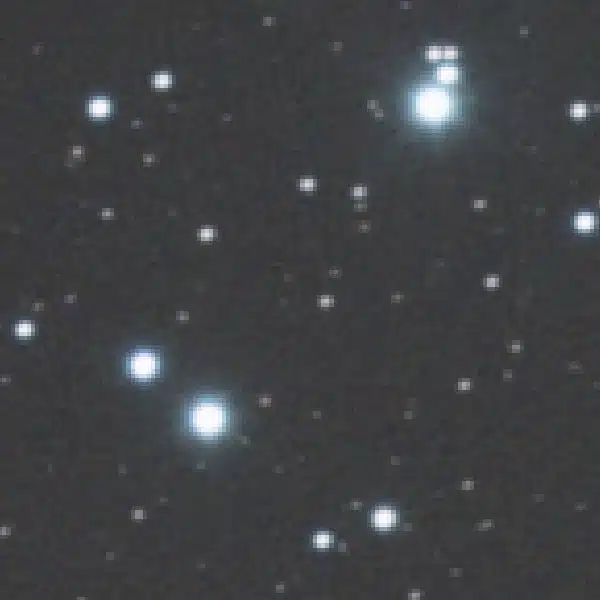
Cassiopeia is in the best location in the sky to minimalize any balance issues. I really like shooting this constellation, so I was happy to let this be my target tonight. My son likes Cassiopeia too as it was the first constellation we photographed together so that settled it.
I decided to image at f/4 and an ISO of 800. I’m going to continue to be aggressive with an exposure time of 60 seconds. We’ll go as long as we can without freezing or until the clouds roll back in.
Putting it All Together
We were able to image for about an hour and a half. My camera was not digging the cold temperatures at all. During the imaging session, the stars started drifting a little down and left. It wasn’t bad so I let it go. But then it stopped. I was pretty happy at that point as you can imagine. Then the stars started drifting up and to the right. Pretty sure this is a balance issue. But the overall drift over the whole imaging session was only about 1 to 1.5 degrees. Nothing worth intervening with. I accept that there will be some lost photos.
The conditions started rapidly declining and my son turning blue, so I called it a night. Besides, I was ready to see the results. Out of the 50 light frames that we shot, I kept 25 for stacking. I lost a few photos to a couple of airplanes. And then I dumped a few due to satellites. The balance of the photos showed signs of mechanical error. I’m certain this is a frictional issue. I was fine with keeping 25 good shots. After taking some darks and flats, it’s time to stack.
Per my usual routine, I used Deep Sky Stacker followed by Siril and then a quick touch-up in GIMP. Below you’ll see the image of Cassiopeia.

The Verdict Is In
It’s the right time to determine where I am with this project. After months of development, fixes, redesigns, accidents, epic fails, and weather woes, I’m ready to declare this project a success. I believe with my current design, I’ve pushed the limits as far as they can go. I’ve proven that the Lego Star Tracker is serviceable with exposures up to 60 seconds as long as you don’t mind losing some exposures to mechanical noise (ie. friction). It has some minor issues with balance that require finicky attention. But for all its faults, this is a working DIY star tracker!
I think that you could improve the photo rejection ratio significantly by shortening the exposure time to 30 seconds. That’s a significant improvement of signal to noise over the shorter exposure stacking method. And as mentioned before, a different bracket to mount the camera would help overcome most of the rest of the balance issues. That’s as far as I can take it though while preserving the Lego spirit of things.
Where to Go From Here
The first thing I’m going to do is put together a detailed build plan for the Lego Star Tracker which I’ll reveal in a future post. I’ll reiterate that if you have a choice between buying several hundreds of dollars worth of Legos or buying a star tracker – buy the star tracker. But if you have lots of Legos or if you just want the satisfaction of doing something interesting, I’ll do my best to give you a head start. I’d love to see someone improve upon my design.
Second, I’m going to cheat. I want to draw a line here with the Lego Star Tracker because it’s almost all Legos outside of the mounting bracket, ball head, and counterweights. It was important to me to fight the urge to introduce any more non-Lego components. But now that I’ve shown that this is a viable design, I’m going to think about what other non-Lego modifications I can make to improve the tracker’s performance. I’ll still try to keep it to a minimum, but I’m not going to restrain myself. For example – I want to introduce bearings to work on the friction issues and see if that helps.
Third, with the 3D printer in my arsenal, I’m going to begin thinking about a 3D printed star tracker solution. Why not? I’m not afraid of putting the work in with custom electrical components and motors. If the weather continues to be fickle, it’ll give me something to do between imaging sessions. Besides, putting Legos through their paces has allowed me to learn about the important design concepts and principles in designing a tracker. I’d like to put that learning to use.
So lots to do on the horizon so stay tuned.