![]()


The weather is teasing me. Beautiful clear and warm days that yield to hazy high cloud nights. The moon also reminds me of who the boss is by casting its light while perched high overhead. Well, if I had to wait for perfectly clear nights here in Southern Poland to take photos I probably wouldn’t get out much at all. So I assembled all my gear and headed into the backyard. I can use the clear-ish night to continue testing the Alpha version of my 3D-printed star tracker and have a little tracking fun with Ursa Major which is sitting directly overhead. Besides, the mild temperature this evening is just too pleasant to pass up!
Learning New Things While Setting Up
Before I get into the imaging session, I need to tell you that I had a real duh moment while setting up tonight. I usually level my tripod and then mount my rig without giving much thought to my orientation. But I was surprised this evening that my assembled rig felt extremely unstable. This is weird because I replaced my tripod’s rubber feet with spikes to gain some additional stability on the grass. But what I realized is that I had oriented my tripod with 2 legs forward and 1 leg pointed back. Duh. The center of gravity of the rig is sitting precariously close to the edge of the stability triangle formed by the base of the tripod legs.
Easy fix – rotate the tripod by 180 degrees and relevel. I was a little annoyed that I lost imaging time just getting my tripod set up. However, now I know that in the future that I need to keep one leg of the tripod directly under my counterweight. This will ensure maximum stability by keeping the center of gravity as close to the center of the stability triangle as possible. You really do learn something new every time you go out!
Let’s Get This Show Started
Tripod leveled and rig mounted? Check. Polar aligned? Check. Let’s get tracking! Between the moonlight, city light pollution, and the general airglow I have very low expectations for tonight. So why not just pick something easy and play with the tracking? Yeah, and with Ursa Major still sitting directly overhead, that was an easy target choice.
Tonight’s plan is simply to test a few things. First, I added additional weight to the counterweight bar so I could move the counterweight closer to the axis of rotation. I want to confirm this will reduce the harmonic vibration in the photos due to the flexibility of the counterweight rod. Second, I want to continue analyzing the tracker’s performance in counteracting the Earth’s rotation. The problem with tracking is that there are so many variables that come into play. If any one variable is off, then it can be difficult to isolate where the issue lies. So I’m comfortable that I’ve got everything pretty stable and can really focus on my tracking rate now.
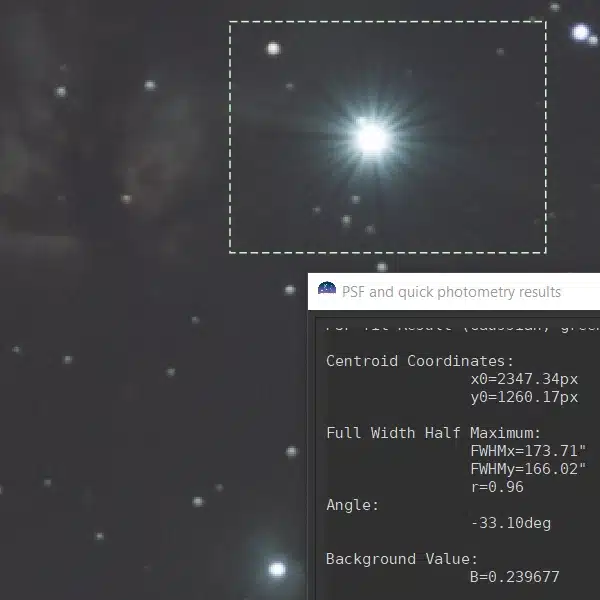
The Samyang 135mm f/2.0 ED UMC lens is my go-to lens at the moment. This thing just rocks! I’m sticking with 30-second exposures at f/2.8 and an ISO 400. Yeah, these will be noisy due to the light pollution but I’ll be able to work with them. I decided to camp on the star Merak because I know there are some interesting celestial objects in its neighborhood. At a focal length of 135mm, I’m not expecting glorious things, but it’ll give me a reference point moving forward. And I’ll shoot as long as I can. Now I’m ready to start tracking and have some fun with Ursa Major.
Starting the Tracker
Ah, Houston, we have a problem. So the electronics of the tracker are working fine. But from the photos, I can see that I’m not tracking at all. Where’s my stinkin’ flashlight? Well, a quick review of the tracker showed that the combination gear was bound and locked in place. This is entirely due to the 3D-print relief of the gears. That’s kind of good for me to see. Because that means all the hours I’ve been spending on sanding the crap of the Beta version’s gears is going to be worth it. Additionally, it makes me happy that I’m gearing Beta down a little more aggressively which means I’ll have more torque to drive the shaft. And finally, I’m considering adding some silicone grease to Beta’s gears, but that’s for another time.
For now, I need to live with this “feature” of the Alpha tracker. Easy fix though. I just wiggled the gear a bit and heard a little click. Voila! Now I’m tracking.
Session Parameters
I managed to image for about 2 hours and took about 175 light frames, 35 dark frames, and 50 flat frames. I was tempted to stay outside a little longer. But the high clouds were getting thicker and as it was already 1AM, I had to ask myself if a sucky day at work tomorrow was really worth it. Nope, I want my sleep! But I did see something else that made me happy even in the wee hours of the morning. I see Cygnus rising up nicely in the East. Won’t be long now before I can start imaging the North American Nebula and stuff again. Very cool.
After breaking everything down and getting back inside, I kicked off Siril to process and stack the photos. Yep, the light noise in the photos is intense but manageable. I processed the resulting image using Siril’s tools and then took it into GIMP for a quick stretch. Below is the resulting image of Merak and Dubhe.

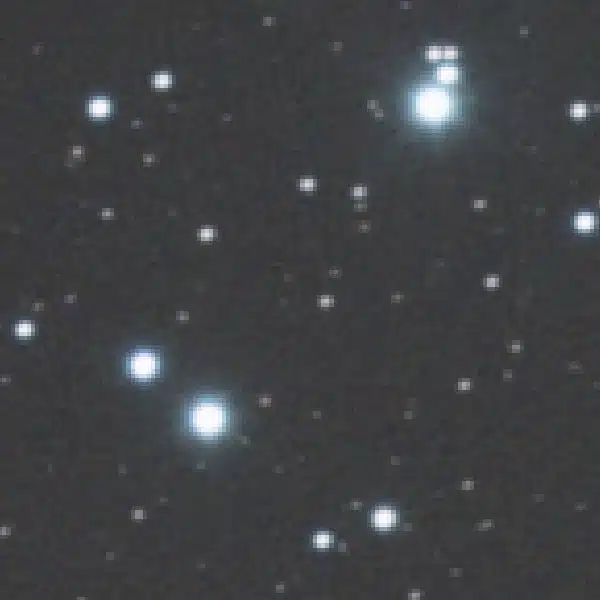
If I zoom in 50% around Merak, you begin to see some pretty cool deep-sky objects. You can clearly see the Owl Nebula and the Surfboard Galaxy. How cool is that? I mean, 135mm doesn’t do these objects justice, but I’d definitely shoot these again at 135mm on a clearer night when I can gather more data. This is the kind of thing that makes tracking a target like Ursa Major really fun. You get to pull out a lot of details that you’d never see by taking short exposures.
Results
As for what I was looking to test. I can confirm that I saw a lot less sensitivity to vibrational noise in my photos with the counterweight higher up the rod. In general, everything just feels more stable when it’s nicely centered and balanced.
I can also confirm that the tracking was relatively solid. I did see issues that are clearly related to the 3D-printed gears in their rough state. But the good thing is that it’s easy to spot as the angle of the trails remains constant and you can see bind-skip-bind patterns in the images. Again, hopefully, this issue will be firmly buried in the Beta version of the tracker.
What’s Next
Well, I’m going to keep plugging away on Beta. I think I’ve managed to come up with a clever solution to my tube clamping conundrum and will print a test later this week. That means I might be pretty close to a testable version of Beta. I decided that I’m going to use the electronics from Alpha to begin testing Beta. This is primarily because I want to verify the new concepts before I lock into a lot of intricate wiring work. But it’s coming along brilliantly and I’m looking forward to writing more about it.