![]()


The forecast called for cloudy skies. The forecast was wrong. I began to have my doubts around 5 o’clock when swaths of blue started peeking through the harsh gray sky. I thought – maybe there’s a chance but I didn’t want to get my hopes up too much. However, by 6 o’clock there wasn’t much in the sky at all except for a sparse fleet of white cotton ball clouds. If my goal is to simply get out and test the tracking capability of the finished Gamma Star Tracker, this should definitely be possible. And then by 7 o’clock, there weren’t many thick clouds around at all. Time to head out! So on this surprising night of relatively clear skies, I put the production version of the Gamma Star Tracker to the test. And the weather wasn’t the only surprise on the menu after I evaluated the performance of the star tracker.
I Wasn’t Prepared to Shoot
I mentioned yesterday that I was going to start with the 50mm lens to give myself the best chance for success. But beyond that, I didn’t have much of a plan. And to be clear, the skies weren’t great. They were just good enough that I’d be able to start shooting and I’d be able to test how well Gamma would perform. And that also meant I wasn’t going to get all twisted up about the neighborhood light pollution and sky glow in these humid conditions. So with that, I figured Andromeda would be as good as any target to shoot this evening. It has a nice surrounding star field and I’d be able to see how steady Gamma operates when capturing Andromeda’s galactic features.
It didn’t take long for me to focus and polar align. This is all pretty simple when using the 50mm lens. I actually like focusing with the 50mm because I can use the computer to step the lens in autofocus mode. Once that was done, pivoting the camera to center Andromeda was pretty easy. With the light pollution, I decided to stop the lens at f/4. My goal is to take 30-second and 60-second exposures in whatever time outside I have tonight. Unfortunately, that will push me down to 800 and 400 ISO respectively. I really want to image around 1600 to 3200 ISO but I’m not going to be picky. Tonight is all about seeing if the star tracker performance measures up to my expectations.
Time to Let ‘Er Rip
Here goes nothing. 30-second exposures at f/4 and an ISO of 800. The tracker is on and supposedly tracking. I set the sequence to take 60 images. I really didn’t know what the weather was going to do and I wanted to get to some 60-second shots as well. So the first image pops up on the screen and it looks pretty good. OK, that’s not surprising when shooting at 50mm. I’ll know more when the second image displays and I can see how much the image shifts. Well, it didn’t shift. We’re off to a great start. OK, time to make some dinner while this cycles through.
After the first sequence was done, I could see that the image shifted a little bit. I expect this. The skies are looking pretty clear so it’s time to move on to the 60-second shots. 60-second exposures at f/4 and an ISO of 400. I’m going to let it run for a full hour this time. The first shot looked good as did the next two. I’m now starting to feel a little giddy. Is it really working? Truth be told, I won’t know for sure until I can review the images later tonight. But I’ve seen enough to know it’s at least tracking although I don’t want to get too excited.
When the hour was up I saw my first surprise of the evening. My target star was still in its overlay box on my screen. That’s actually never happened to me before. Did the sequence finish? Yep. Huh, interesting. Ok, the skies are still clear so let’s run another hour. I returned after another hour and once again found my star in its overlay box on the screen. No way I thought. There’s no way it tracked that well over two hours of imaging. But now I’m intrigued. Let’s take some darks and flats just to be safe. So I did. And now I’m ready to pack everything up and start analyzing my photos.
Star Tracker Gamma 50mm Performance Review
Now back in the comfort of my home, it’s time to see what really happened. With each passing image, the smile on my face just got wider and wider. The 30-second exposure shots came out great. I took 60 photos and none of them were tossers. In other words, for the first half an hour sequence 100% of the images that I took are keepers. The following photo is literally the worst photo of the bunch as ranked in Deep Sky Stacker.

Well, that’s not bad at all! Alright, alright. It’s only a 30-second exposure at 50mm. What about the 60-second exposures?
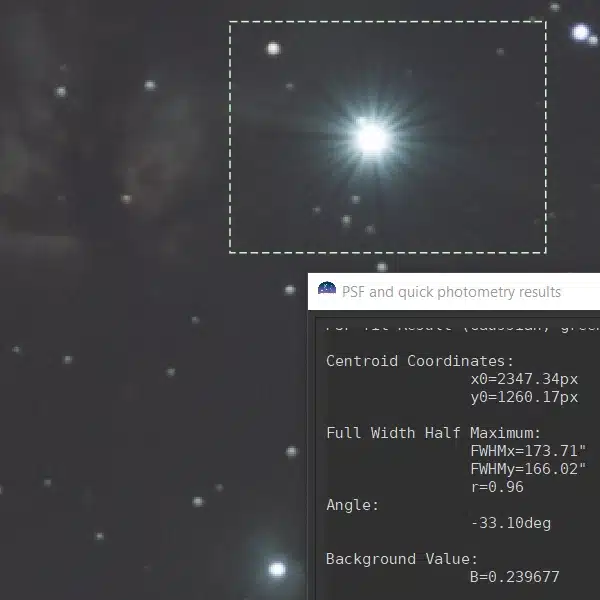
I took 105 60-second photos. I threw away 6 photos because a cotton ball cloud zoomed through the frame in the middle of the first sequence. So that left me with 99 photos. Drum roll, please… Out of the 99 photos, I kept 92 photos, or 93% of the images taken. Easily the best night of tracking with any of my DIY trackers even at 50mm. OK, so what about those 7 failed photos? Here is the worst photo of that group…

I’m going to chalk this photo up to an imperfection in the printed gears or perhaps a slight breeze. This was the only photo that showed “double stars”. The others simply showed an elongated trail. But again, I kept 93% of the photos!
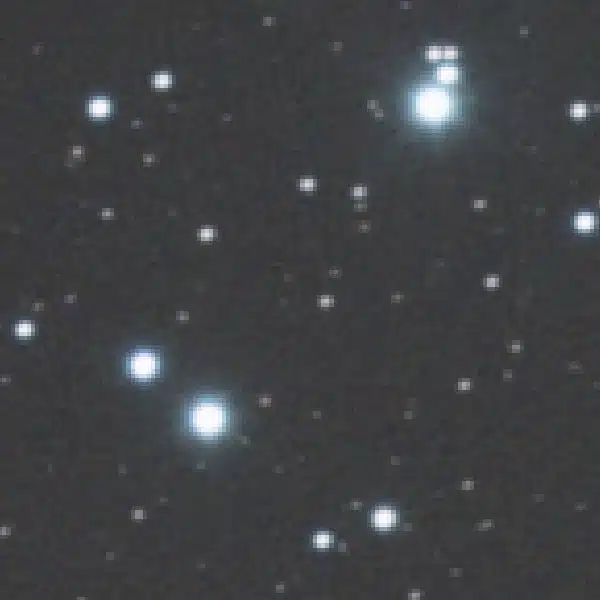
Another interesting view of how well the tracker performed is to look at all 92 photos stacked without being aligned. In other words, this is an image of all 92 photos without lining up the stars which is easy to do in Deep Sky Stacker. So from this view, it’s clear that something shifted during the imaging session. But regardless, this is a photo grouping over the course of 2 hours of imaging. I was not expecting this kind of performance on my first night out with Star Tracker Gamma. I’ll take it!

First Stacked Image from Star Tracker Gamma
I didn’t put too much time into processing this image. I’m still riding high with how well the star tracker performed. But since I took darks and flats, I figured I might as well finish the image. Here is the finished result from Star Tracker Gamma’s first night of testing.

Now, this isn’t one of my best photos to date. Perhaps a bit underexposed. But it wasn’t supposed to be a good photo. This session was all about seeing how my finished version of Star Tracker Gamma measures up in tracking. And to say I was impressed with Gamma would be an understatement.
Next Up
Well, I guess I have 3 things to do now. I’d like to run this test again with the 50mm just to see if I can duplicate the results. Then of course I’ll move on to the 135mm lens. But since Gamma does work, I’ll be sure to zip up the CAD files and post them shortly.