![]()


As bad as the weather has been from November through February, I’ve managed to get outside for 7 straight days. And it appears that there are a few more clear sky nights ahead of me as well. That’s the good news. The bad news is that my time to shoot Orion is rapidly fleeting. I’m just about resigned to the fact that I’ll need to wait until next year to try again. But hey, I’ve got lots to do with my 3D printed star tracker. I’ve been tinkering away, making improvements, and developing quite a list of lessons learned surrounding tracking with my DIY star tracker. Let’s dive into the recent developments.
Fixing Issues with the 3D-Printed Star Tracker
Before I get into the lessons learned with the star tracker, I need to share a couple of issues that popped up during testing and my solutions thus far for managing them.
Stability

SharpCap has been clutch in helping to get me polar aligned. So that’s it, right? Wrong. You know the drill – solve one problem and three more appear. As impressive as my 3D-printed wedge looks, it really lacks the stability I need to get an accurate polar alignment. I suppose there is a very good reason a good wedge will set you back a couple of hundred bucks. I’m not inclined to drop that kind of cash yet so I need another solution. The easiest thing I can do is print a solid wedge at the correct angle of my attitude which is 50.12 degrees North. So that’s what I did. Mind you, that’s only part of the problem though.
Optical Alignment
I’m mounting the camera on a pan clamp so that I can position my camera to any point in the sky along 2 axes. This is a very stable setup that I’m very pleased with. However, mounting my camera to the arca swiss plate to perfectly align the optical train is another matter. There is really no way that I can easily ensure that the optical train of the camera will be precisely aligned. And if I can’t guarantee that, I can’t precisely polar align.
But I have a strategy. If I can properly level my tripod and then add the ball head mount and properly level that, I should be able to trust my wedge is set to the proper angle. This means I can simplify my polar alignment by panning horizontally. Now, my polar alignment isn’t handicapped by any misalignment in the optical train. I know it’s a big assumption to trust the wedge position and yes I know it will never be bang on, but it should be close enough – at least on that axis. This, however, can only be a short-term solution until I figure something else out.
Camera Mount Stability and Balance

Originally, I was just planning to slide the 3D-printed camera mount over my axis rod. However, there was far too much friction in the system which impacted my ability to balance the mount. So it’s time to add some ball bearings! This actually worked out really well and has the added bonus of keeping my locking screws better aligned which helps me securely tighten down the camera.
There is a problem with this solution though. Adding press-fit bearings to the mount is kind of a one-way street. I won’t be able to remove the bearings without seriously damaging the star tracker. But, I’ve got a printer and a local supply of ball bearings so I can always print another if need be. I think I’m going to need to anyway due to another issue but more on that later. So the risk is worth it.
Star Tracker Lessons Learned Thus Far
OK, now to the fun part. You know, the hours upon hours of head-scratching trying to figure out what the heck is going on with the images I’m taking. Well, that’s fun for me at least. The challenge is that I’m not at the point of declaring victory with the integrity of my tracker. If I only had to worry about my setup, things would be a lot easier. But right now, the problem could be my setup or the design. I won’t really know until I get a lot more testing done. The good news is that things are going well so far. And as I’m getting comfortable with my setup, I’m learning an awful lot.
#1 – Balance is Key
I knew this was going to be very important which is why I am mounting the camera to the axis using ball bearings. But I was surprised to learn how vitally important balance really is! When the balance is off, the tracker won’t track. Even with a 100:1 gear reduction which gives me loads of torque, my little stepper motor can’t overcome all the forces when unbalanced.
Side note – I did test the 135mm stock lens telephoto and did get some results. However, my arca swiss plate is too short to allow me to slide it back and forth enough to achieve balance. I haven’t decided yet if I’m just going to purchase a longer plate or print one. I’m leaning towards purchasing one because it will be more stable than a printed part. More on the 135mm test in a bit.
So the lesson learned is that it’s best to take your time balancing the star tracker to set things up for success. Otherwise, you’re going to see some pretty funny things going on in your photos. As you can see, when things are out of balance with my star tracker, I’m seeing a lot of binding issues.

#2 – Keep Stable
The fewer moving parts the better. One of the biggest problems with my initial wedge design was that once I started locking down the screws, it threw my polar alignment off. Which meant I had to start the alignment all over again. So, for now, it’s best to limit the moving parts of my mount to those which have been precision machined.
This is also the reason that I added the ball bearings to the camera mount. Just to ensure that everything is staying aligned.
#3 – Not Ready for Longer Focal Lengths
So I already mentioned that I can’t balance the longer focal length lenses yet because I don’t have a long enough arca swiss plate. Regardless, I have some minor concerns about the mechanical vibrations that appeared in the 135mm photos. Now, I’m not sure at this point whether this is due to the rough nature of the printed gears, or simply a balance issue. More testing on this front is needed.
Another issue with the longer focal lengths comes back to polar alignment. The 50mm lens is going to do a good job in masking polar alignment issues. At 135mm (or greater) though, you will absolutely see the drift from a bad polar alignment. So before I get tricky with the longer focal lengths, I need to think about how to design a better polar alignment strategy.
#4 – Light Pollution Sucks
When taking short exposure photos, light pollution really interferes with your ability to get a good signal-to-noise ratio in your photos. However, it’s somewhat manageable in post-processing. When taking tracked photos though, I’m finding that it’s much more difficult to strip out the light pollution in post. Mind you, I’ve been testing the tracker and not really imaging, so I’ve passed on taking dark and flat frames for now. This was a big mistake on my part.
It appears to me that taking dark, bias, and flat frames is more important when tracking. In thinking about this, this kind of makes sense. The longer exposure time gives the sensor more time to collect noise in the photograph. The noise terms (most of them anyhow) in shorter photographs are smaller and more easily offset in post-processing – even after stacking. But I can definitely see some sensor artifacts in the noise of my tracked photos. Without darks, biases, and flats, there’s little I can do at this point to correct my photos.
The lesson is – to take your dark, bias, and flat frames whenever you take pictures.
#5 – Wind Also Sucks
On one of the nights I was testing the star tracker, the wind was a bit gusty. It had my cords and the tracker electronics and the whole rig for that matter flopping around. I observed some pretty gnarly effects in the stars in a couple of photos.
This problem though can be somewhat mitigated. First, make sure the tripod is firmly standing on as flat a surface as possible. Second, tape down anything loose. Third, hang a weight off the bottom of the tripod column. Forth, pray for calm.
The wind will go where it wants – I’ll take blustery clear skies over cloudy skies any day. It’s just something you have to do your best to work around.
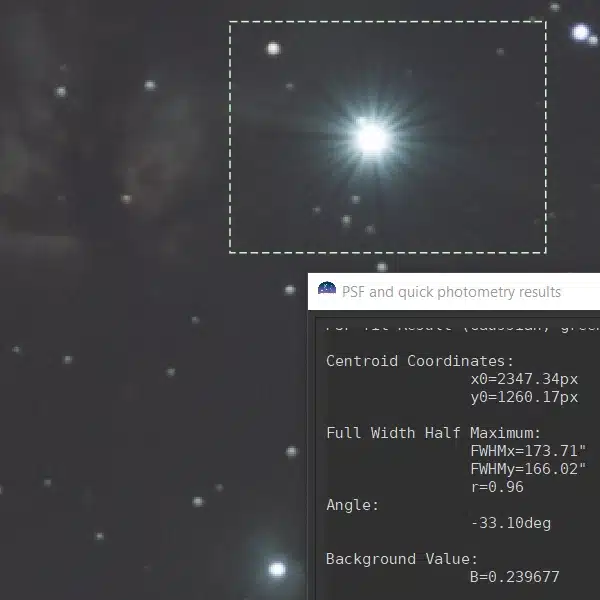
March 22, 2022 Test – Mizar
Ok, I’ve talked a lot about what I’ve done to improve the star tracker and the lessons I’ve learned thus far in testing it. How about some results? Well, I got out last night and managed to image for about three hours. Here’s how that went down.
After getting polar aligned as described above, I aimed the camera at the “handle” of Ursa Major. The reason for this was from my Bortle 6 location, this was the object in the sky furthest from any major light pollution sources. At 50mm, I wasn’t expecting anything glorious but thought I’d get betting pictures than shooting at an object over Krakow.
Given the light pollution, I wanted to stick to 30-second exposures and found that f/4 with an ISO of 400 was fine for testing. I probably could have gotten away with an ISO of 800, but I didn’t want to change it up. I managed to take 250 30-second photos of this region of the sky.
To my amazement, I was able to keep 201 out of the 250 photos that I took. I mean, 80% of my pictures produced nice round stars (within reason). That’s about the quality ratio that I’m hoping to get with this tracker consistently.
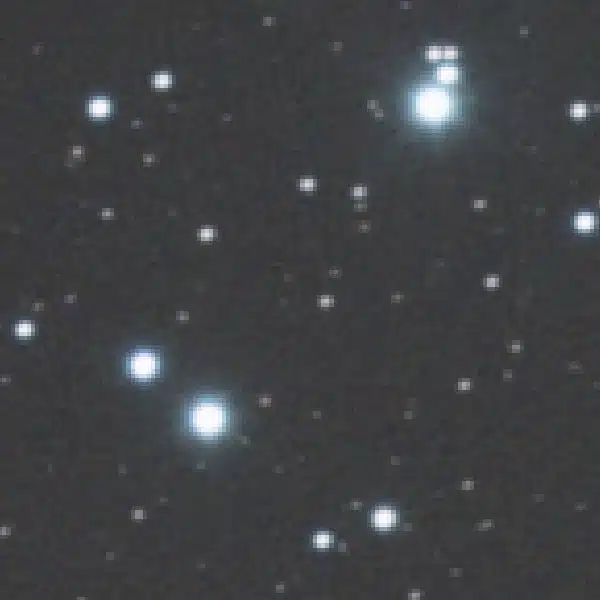
Processed Images
I processed the photos entirely in Siril this time. Below is the whole image I captured. Notice the impact of the lack of darks, flats, and bias frames… Facepalm…

There are a couple of other little gems hidden in this photo. The Pinwheel and Whirlpool galaxies made their grand appearances – finally! Although the Whirlpool galaxy was out on the edge of my frame and the lens coma began to dominate. I’ll take it though.
| |  |
| Pinwheel Galaxy | Whirlpool Galaxy |
Yes, I know, you don’t want to be shooting these objects at 50mm – what’s the point, right? But the fact that they appeared with any resolvable detail tells me that the tracking was working well! And with the lessons that I’ve learned with using this star tracker, I’m sure it will only get better from here.