![]()


I’ve been continuing to tinker with this and that with the 3D-printed star tracker. And the clear skies have given me a lot of opportunities to test my progress. Truth be told, it’s been going miserably. The 3D-printed star tracker is tracking great with the 50mm lens. It’s actually the imaging that I’ve been struggling with at the moment. I’m finding that processing the tracked images is uncovering issues that I never really knew that I had. This is a good thing and I’m working on a post, in particular, to address what I’ve discovered. But in the meantime, I continue to head out to test. And today, I want to briefly share my latest test with the 3D-printed star tracker with my stock DSLR 135mm telephoto lens.
Preparation for the 135mm Telephoto Lens
During my previous testing with the 135mm lens, I mentioned that I was having problems balancing the camera because my Arca-Swiss plate was too short. So before I try and run a test again, I need to print a new Arca-Swiss plate to give myself a better chance for success. I’d like to try and print an Arca-Swiss plate before purchasing one so I know what the ideal length will be. And, I’m just dying to get my Samyang 135mm lens on this setup but it’s just too heavy to balance. More on that in a bit.

I wanted to create an Arca-Swiss plate that would let me mount a fence to align the optical path. This would also keep the camera from sliding on the plate as the star tracker rotates. As for the length, I decided to start with 10cm and see how that goes. For now, I’m still planning on connecting the plate directly to the camera as I don’t want to invest in a lens foot. After testing this strategy though, I believe I’ll need to rethink this approach. But here’s what I whipped up in FreeCAD for this round of testing.
The fence was easy enough to draft as well. I did have some concerns about how well this would print given the dimensions, but it ended up printing just fine. I did do a little sanding on both parts once they were printed. But they fit together nicely. Not too snug, not too loose. Good enough for testing!

On a Solution for the Samyang 135mm…
This is a bit of a spoiler alert. But after testing, it’s clear to me that I’m not going to be able to mount the 135mm Samyang lens on the 3D-printed star tracker as is. The plate that I’d need to print or buy would be far too long to retain stability in the overall system. So I’m going to need to either purchase or print a mounting solution for this lens.
In researching a mounting solution for the Samyang 135mm lens, I stumbled across a solution offered by Astrodymium that looks promising. The problem with the Samyang 135mm lens is that it’s soooooo heavy due to the optical elements. I’m happy to trade weight for image quality here, but it makes mounting it a real pain in the butt. Clearly, if I’m going to have any hope of mounting the Samyang 135mm on the star tracker, I’m going to have to mount the camera via the lens.
One of the other interesting things about the Astrodymium solution is that it’s a 3D-printed product. Well, since I have the printer, I might as well try my hand at my own solution. So there’s my next little side project.
Image Testing the Stock 135mm Lens on the Star Tracker
OK, I know you want to get the skinny on the tracking results with the 135mm stock lens. Well, I’m happy to report it went really, really well. I can tell there are some issues, but once I was able to get better balance, a number of the problems I experienced in my first 135mm test went away.
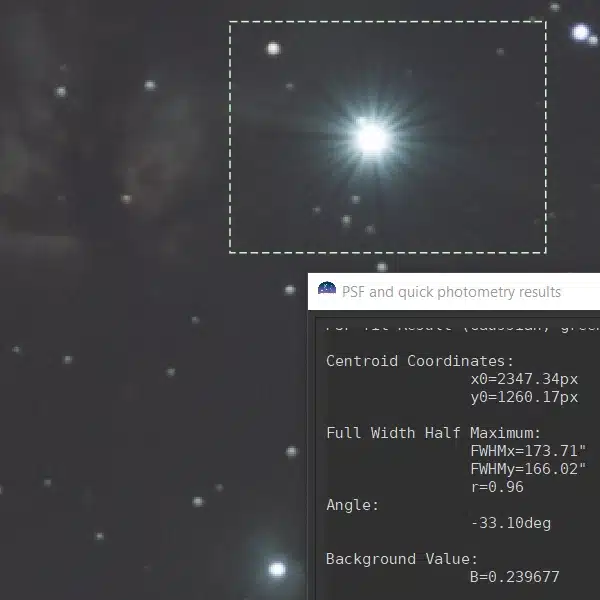
First, my polar alignment since using SharpCap with a fixed wedge angle is working very well. It’s not perfect and it’s a bit finicky, but with patience, I can dial in the alignment good enough to image. The fence on the 3D-printed arca swiss plate appears to also work very well in keeping the optical train aligned along the axis of rotation.
Second, I can definitely tell from my 135mm images that the roughness in the gears of the 3D-printed star tracker is going to begin coming through in my images. Mind you, they aren’t terrible, but they are present. I think when I spin version 2 of the 3D-printed star tracker I’ll look to smooth out the worm gears after they’re done printing.
Imaging Setup and Results
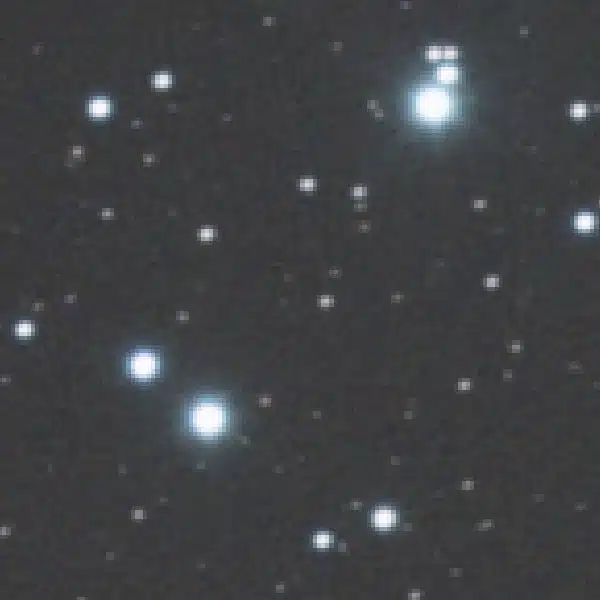
And finally my results. For my subject, I’m pretty happy to keep focusing on the Pinwheel galaxy area of Ursa Major. This target isn’t ideal for the focal lengths that I’m shooting, however, it’s the area of the sky that is farthest away from Krakow’s light pollution. 5.6 is the minimum aperture that my stock lens can shoot at 135mm. After a few test shots and reviewing the histograms, I settled on 30-second exposures at ISO 3200. So that’s the setup and I let the system run for just under 2 hours (200 images). I then proceeded to take 25 dark frames and 25 flat frames.
After getting inside, I went through all the photos and came out with the following distribution of photos. 68 photos were almost perfect in terms of star roundness. 99 photos showed very small trails which I believe are due to perturbations in the star tracker gear train. And finally, 32 photos were entirely unusable due to star trails and/or satellite trails.
Siril Processing
I decided to stack and process the 68 “good” photos entirely in Siril. I simply used the OSC_Processing script to do the heavy lifting. Then some normal adjustments using the background extraction, photometric color calibration, green noise reduction, color saturation, and an autostretch. Below is the final result using this workflow.

Again, I’ll remind you that I’m shooting unfiltered from a Bortle 6 zone as you will see some light pollution gradients in this photo. I’m not overly concerned about this right now as I mainly just want to get the imaging setup and workflow ironed out.
So that’s where things stand at the moment. Hopefully, I’ll be able to get outside another time or two before the weather turns to continue my testing. But thus far, I’ve been very happy and quite frankly surprised at how well the tracker has been working. It’s not without its hangups, but it has certainly exceeded my expectations thus far.