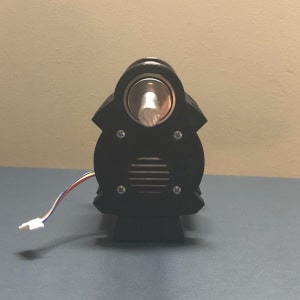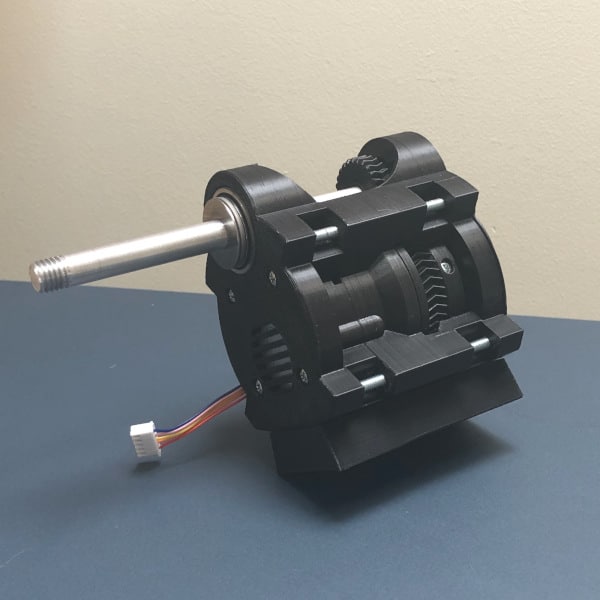
Being an engineer is a curse sometimes. No matter what, you can never stop thinking about how to make something better. And that applies to my own astrophotography gear designs. Star Tracker Gamma has advanced my astrophotography results significantly and increased my overall joy of the hobby. So I have no complaints there. But I also know that I can do better. Therefore I set off on developing a new design using many of the lessons that I learned with Gamma. My goals are humble: keep it simple and keep it inexpensive. Well, I’m well on my way toward achieving both of those goals. So today I’m happy to reveal the first part of my next-generation 3d-printed star tracker.
Next-Generation Star Tracker: Simple and Inexpensive
While Gamma’s body measured in at over 50 3d-printed parts, the next-generation version thus far has a meager 13. That represents about a 75% reduction in the number of printed parts. It also represents a significant reduction in the complexity of the design. Now before I get ahead of myself, I need to warn you that the star tracker is not complete yet. I have not yet decided how I want to build out the electronic aspects of the device. But I’ve designed this tracker to be modular. So after I’m done testing my electrical components, I can simply plug them into the design. I also designed it this way so anyone who wishes to follow along can modify the electronic aspects to suit their budget and/or functional needs. More on this at a future time.
Next, I really worked to keep the cost of the tracker to a minimum. My goal for this project is to keep the budget to less than $100. And when the tracker is completely finished, that’s about where I’ll land. That said, it’s important to note that I chose to purchase higher-quality parts for this build. You can certainly save some money by buying lower-cost bearings and downgrading the electronic components. Today, I’m not going to price out the electronics, but rather those parts that are found in the next-generation star tracker mechanical drive as documented in this post.
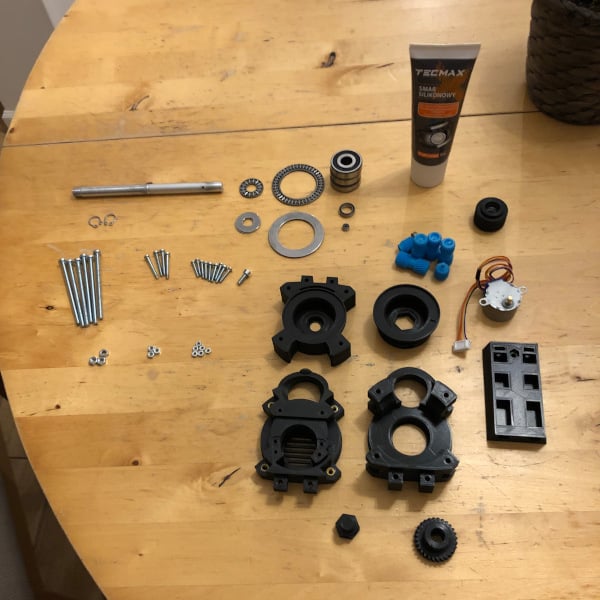
Here’s a view of all the parts needed to assemble the mechanical drive.
3D-Printed Parts List
Below is a detailed list of the 3d-printed parts for the next-generation star tracker.
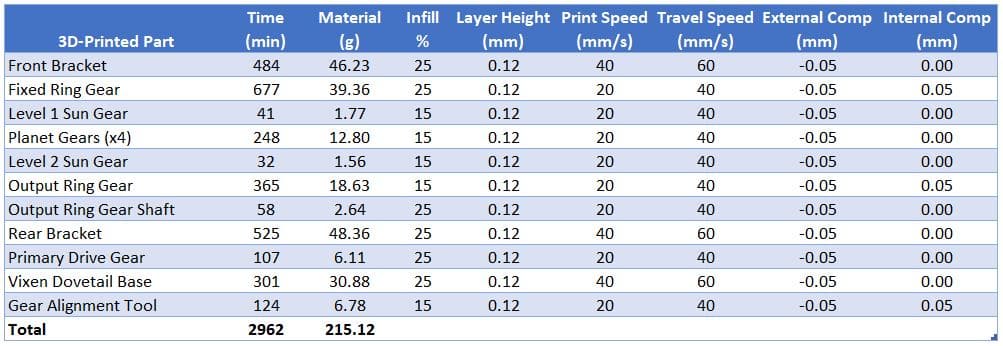
I used a 0.4mm nozzle and as you can see, I really took my time with printing these parts. This is because I need to squeeze as much precision out of printing the gears as I could. While it took over 2 days to print these parts, it was well worth the wait! I’ll mention though that it is critically important to ensure that your printer is tuned before printing these parts. Ensure your bed is level and your extruder is calibrated to produce accurate dimensions.
This design uses 4 identical planet gears. This is really cool as it doesn’t matter which gear is in any of the 4 positions. Because the only thing that matters is that the gears are oriented in the same direction. Accordingly, the north position is clearly marked on the top and bottom of each gear. But to really make things foolproof, I designed an alignment tool that holds the planet gears in the right orientation in order to load them into the fixed ring gear. The 90 minutes spent printing this part more than pays for itself with the 20 seconds it takes to guarantee the proper alignment of the planetary gears.
Complete Parts List
Sans most of the electronics, the current parts list with prices is shown below. As I mentioned, I paid a little more for higher-quality bearings. I didn’t want this design choice to turn anyone off, so in the table below I priced the bearings out based on an average or mid-quality part that I could find on Allegro.pl.
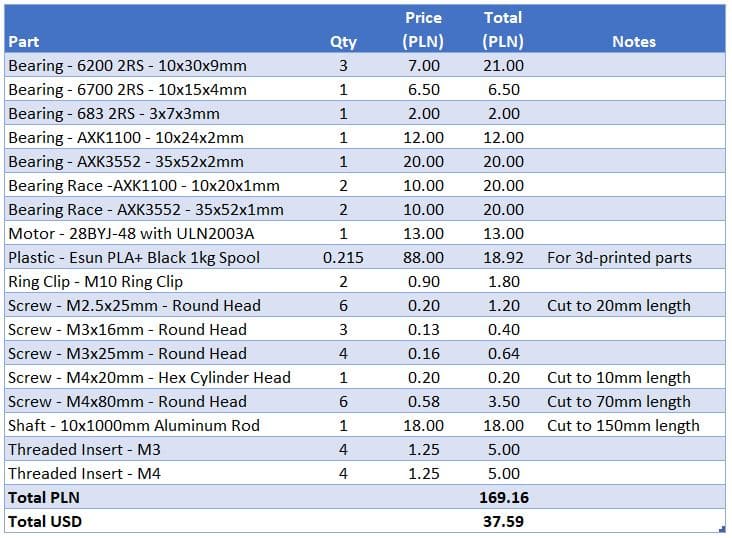
As you can see, the functional component of the next-generation star tracker comes in under $40. Outside of a VAT country, this would likely be around $30. That’s pretty slick. And if you’re even more of a budget hawk than I have been with this project, I’m sure you could probably shave another $5-$10 off the final price.
I’m going to call this a win for both simplicity and cost thus far.
Next-Generation Star Tracker Technical Specifications
What is the next-generation star tracker capable of? That’s the first question that will pop into anyone’s mind and this is an important question to answer. So I’ve begun to compile a list of technical specifications for this device that helps answer that question. Please keep in mind that this won’t be complete until I finish the design and implementation of the electronics portion of this project. However, this is the information that you’d need if you were going to supply your own electronics design.
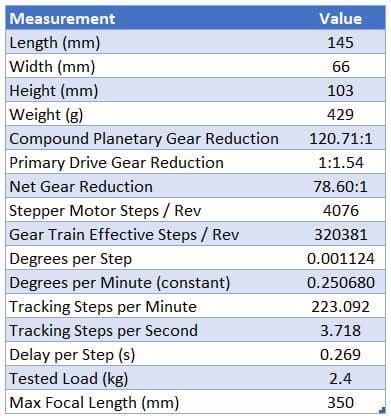
The most important information listed above is the 78.60:1 gear reduction ratio. This allows for the calculation of the number of steps per second that you’ll need to execute to track the stars. With these components, this works out to be a 269ms delay between steps. If you’re using an Arduino chip like I am, you’ll want to ensure that you’re coding this to run in a non-blocking fashion. If you try to use the Arduino delay() command, you will get inconsistent results because the program can not guarantee the accuracy of the delay specified.
The tested load (kg) is just what I’ve loaded onto the tracker for testing. I don’t believe this is the max load and I wouldn’t have any concerns about adding a little more weight. But I would do so carefully and cautiously.
Finally, the max focal length (mm) is a theoretical value at f/2 calculated using the full NPF rule. Any combination of focal length and aperture that demand less than 0.3s exposure will not work. I’ll add that I don’t expect that the tracker would actually work as expected at the theoretical max, but it’d be something to test if you have the equipment. I’m primarily shooting at 135mm and I have dreams of 250mm in the future, so the gearing ratio was selected to ensure I’d have plenty of room to run at those focal lengths.
I Need A Better Name
OK, so sticking with the next-generation star tracker as a name isn’t going to cut it long-term. If I stuck with my Greek alphabet naming convention, I’m up to Eta. I suppose I could call this E-Tracker, but the whole e- whatever name seems a bit overplayed.
Given that the profile of the device looks like the number 8, I thought it would be clever to call it 8-Track. And I was actually really warming up to that notion. However, my youngest son (10 years old) who was helping me put this together, informed me that the tracker profile to him looked more like the Pokemon character Snorlax. Facepalm…

|
I’m finding it hard to go against my son here. So I’ll put it to all of you. What would you call this thing? Leave a comment and let me know.
On the Menu
Don’t worry, I’ll be getting this over on Thingiverse soon enough. The only thing I’m waiting for to test the next-generation star tracker is a clear night to ensure that everything works as expected. Given how my test rig functioned a couple of weeks back, I’m confident this is going to work as expected. But you don’t know until you test it. So hopefully I’ll get a break in the weather soon or at least I’ll be able to duck around some clouds. Once that’s accomplished, I’ll put some build instructions together and publish the designs.

Then the only thing left for this project will be to polish off the electronics. Fair warning, I’m not really planning on getting this done anytime soon. I want to run some tests to see if I can power this with batteries instead of a powerbank. Additionally, I’m going to explore writing an ASCOM driver for this unit so I can integrate this with APT or N.I.N.A. But I don’t want to tether this to my computer, so I’m going to see if I can get ASCOM to work with Bluetooth Low Energy over a virtual serial port. I’m not even sure if this is possible, but it seems to me that this should be possible. I know – those are famous last words… And that seems like a fitting end to this post.

