![]()


A Brief Window of Opportunity
To my great surprise, the weather folks got it right. There was a brief window of opportunity for me to get out and run test 1 on V3 of my tracker which I describe here. I didn’t really put a lot of thought into what I was going to photograph as my goal was just to point the camera in a direction and see how things go on the tracking front.
I got out, got aligned, got focused, and got started shooting. So was I dancing or crying? Did the tracker sizzle or fizzle?
Where do I even start? OK, I got some results. But at the moment I have a lot more questions than I have answers.
Eh, let me take you through what happened and explain where this leaves me with this project.
Getting Polar Aligned
I double-checked and made sure my table was level and then placed the star tracker down. Through the finder scope, I could tell my altitude wasn’t quite right, but it was close. Left to right adjustment was much easier as I just needed to shift the device a bit.
I did clamp the base down once I thought I had it set and then moved on. Something tells me I’m going to be thinking long and hard about this approach and the impact it had on my results. But I digress.
Hands Off Shooting
The game plan for V3 test 1 tonight is pretty straightforward. Let’s get the camera focused and pointed at something and then just turn the tracker on and snap a handful of shots. I’ll focus using Deneb which is almost directly overhead and then I’ll point the camera in the direction of Andromeda which is in a good position relative to my setup.
After getting the camera all set up; I connected to it via the Canon App and then started the Lego Boost App to fire up the tracker. Then, I let the tracker soak for about 2 – 3 minutes in its cycle to hopefully get all the gears engaged and moving (ie. let the slop run out of the system).
Next, I let the camera fire off about 30 pictures at 30 seconds each. And finally, I took a few more shots at exposure times of 1, 2, 3, and 4 minutes and then turned the tracker off and took one last 4 minute shot for comparison. Now it’s time to head inside and check out the results.
Time to Analyze
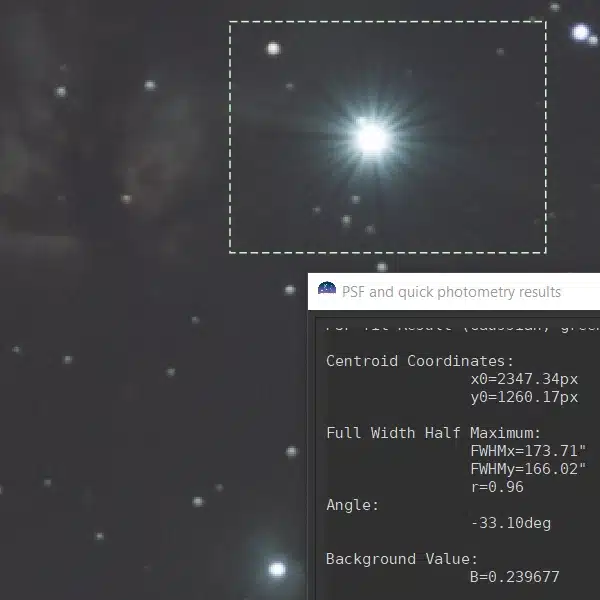
Here is a zoomed-in section of my first-ever tracked photo right out of the camera.
Star trails. Yuk. I mean it’s not terrible, but it’s not what I was hoping for. I searched through the rest of the images and they all pretty much looked the same. So I was at least getting consistent results – and that’s a good clue.
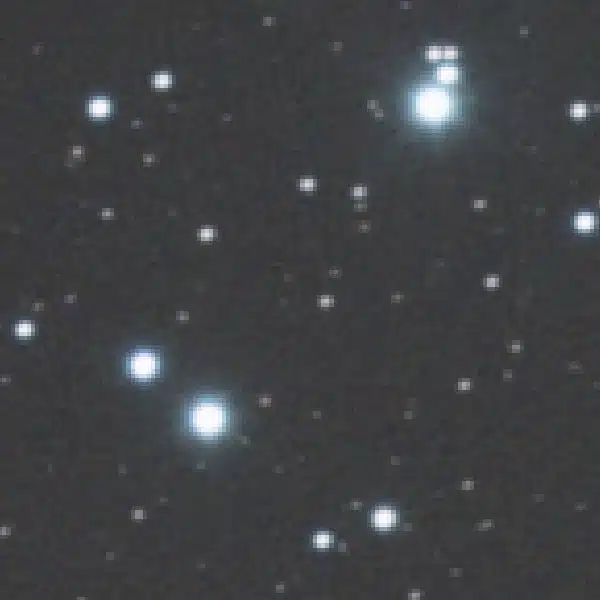
What about the other photos. Well, this is where it gets weird. The 1 and 2-minute shots stayed pretty much true to form. But check out the 3-minute shot I took below.

How can this be? I had less star trails at 3 minutes than I did at 30 seconds, and at 1 and 2 minutes. I mean, don’t get me wrong, this picture is a hot mess. But without changing any of the parameters of the setup, something occurred which allowed much better tracking. Hmmm, unclear.
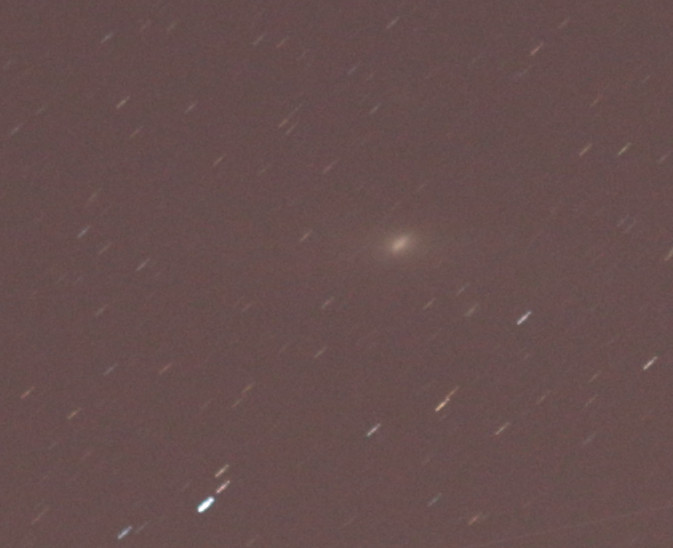
The 4-minute photo and the 4-minute untracked follow. Notice that the untracked photo is not of the same region of the sky. Taking an untracked photo was an afterthought and I’m kicking myself that I didn’t think of it sooner. At any rate, I wanted to get a sense of how long the star trails should be on a 4-minute photo.


Tracking Analytics
Ok, where does this all leave me? I know the tracking wasn’t perfect, but how bad was it really? This is a good question to answer now before I begin the post mortem.
Each photo is 6024 x 4019 pixels. I know with my camera at 50mm, I can view 24 x 16.1 degrees of the sky. Therefore, there are 0.0039841 degrees per pixel in the x-direction and 0.0040060 degrees per pixel in the y-direction.
Now, examining the center of my photo to minimize the lens effects (ie. sharpest stars), I determined that for my 30-second exposure that I saw about 8 pixels of star trail in the x-direction and 7 pixels of star trail in the y-direction. This correlates to 0.03187 degrees in the x-direction and 0.02804 degrees in the y-direction. The straight-line approximation is 0.04245 degrees or 10.6px.
30 seconds of star trails should have resulted in about 31px of straight-line, or 0.125 degrees of travel.
Right, so I was tracking a little bit. That’s good, but now I need to figure out what went wrong.
I’m relatively certain that my number one problem was polar alignment. So better polar alignment should correct a good portion of this error in the future. I’ll be able to verify that the next time I head out.
But polar alignment doesn’t explain everything I’m seeing here. There are other factors that need to be identified and addressed. This was the first test though, and there are really so many things that could have contributed to the final result that it’s probably a bit pointless at this time to try to zero in on any one thing.
The consistency of the 30-second photos and the anomaly of the 3-minute photo is very telling though. I didn’t really come to that conclusion at the time, but further testing actually revealed what it was. If you’re already familiar with tracking, I’m sure you can probably guess.
Lego Star Tracker V3 Test 1 Take Aways
Well, good enough results to keep going and I’m very encouraged. There is most definitely a version 4 that needs to be built. What is it that I’m going to fix? Here are my post-tracking notes on the modifications that I now need to make. I think it’s interesting to note how much a little bit of testing can reveal!
- Need to stiffen up the load arm even more – priority as there’s still a lot of flex
- Need to better polar align – maybe add base adjustments
- New carriage holder to accommodate a wider load arm
- Maybe new gearing to gear down even more so I can drive the input longer?
- New gear train setup
- Shim the worm gear or find a way to bias it
- Camera mount is a little tight and difficult to adjust in the tracker
- Some jiggle in some of the shots – wind, or Lego tire treads?
- Maybe play with the motor power and rotation timing (ie. move more often)
- Illuminated finder scope? Or some plexi to insert.
- Find a way to better secure the base
- Maybe a spring on the worm gear axle to bias it?
- Cover the tires with electrical tape to smooth out the treads or turn them inside out
- Use bricks instead of lift arms for the base
- Build a dumb sight of 1 x Technic hole pieces for a rough polar alignment
- Support the wheel platform.
Alright – I’ve got some work to do now. I’ll be back soon with all the updates and hopefully a better working tracker.