![]()


I’ve been blessed with a string of clear sky nights lately. The only downside is that the moon is casting quite a bit of light. But you know what? I’m not even bothered by this. That’s because the extra light is actually quite helpful as I start to test my 3D-printed star tracker. It’s time! And as you might expect, there was a lot to digest from this first serious test session.
Setting Up for a Test of the 3D-Printed Star Tracker
For the first test, the plan was to quickly set up the 3D-printed star tracker in the backyard and just verify that the tracker does something. Before even getting started, I have a number of concerns that I want to test. First, are the 3D-printed worm gears too rough to ensure jitter-free photos? Second, did I get the maths right so that the tracker is rotating at the correct speed? And Finally, is the whole rig stable enough to support the weight of the camera and a heavier lens on this mount?
First-things-first – I leveled up my tripod and mounted the star tracker. I decided to start testing by using the Canon 50mm f/1.8 lens as this is rather light and would give me the best chance at success. So with the camera mounted it’s time to polar align.
Polar Alignment, My Old Nemesis
I was expecting to fire up Polar Scope Align Pro, pop my camera in a little sidecar that I printed, and line this up without a hitch. Well, needless to say, that didn’t go according to plan.
Turns out, there is far too much metal on the tracker (not to mention the stepper motor magnets) to allow the app to get a good read on the compass heading. So I actually had to visually align the compass heading by holding my phone behind the tracker. This is far from ideal as I’m not likely to accurately align the mount this way. I’ll need to think about a better solution for the tracker moving forward.
With a little patience and a lot of work, I managed to get things as aligned as I can this evening. I thought about doing a drift alignment, but I don’t want to take the time. Now it’s time to turn the tracker on.
Tracker Initialization – A Little Goofy
The good news is that the tracker turned on and started moving. The bad news is that it was a little finicky to get the motor to start turning. This is because I’m currently powering the Nano 33 IoT using my computer and I’m powering the driver board from a USB powerbank. What I learned was that I need to start the Nano 33 IoT program, then hook up the driver board, and then finally reset the Nano 33 IoT program to get the system working.
I want to keep my computer connected to the Nano 33 IoT so I can monitor the serial output from the device. But long term everything will be powered by the USB powerbank, so I don’t see this as a critical issue right now. But I will need to write a little more code eventually to bring everything up properly. I also think this is a function of the powerbank that I’m using as it will revert to standby mode if it’s not actively supplying power.
Let’s Start Imaging!
Ok, so the tracker is kind of aligned and operating. Based on the moon’s position, I decided to photograph Orion tonight for this test. Given the amount of light pollution, I knew I was going to struggle with taking long-exposure photographs without blowing out my images. So tonight, I’m just going to take some 30-second exposures at ISO 400 which seemed to give me enough information to run a good test.
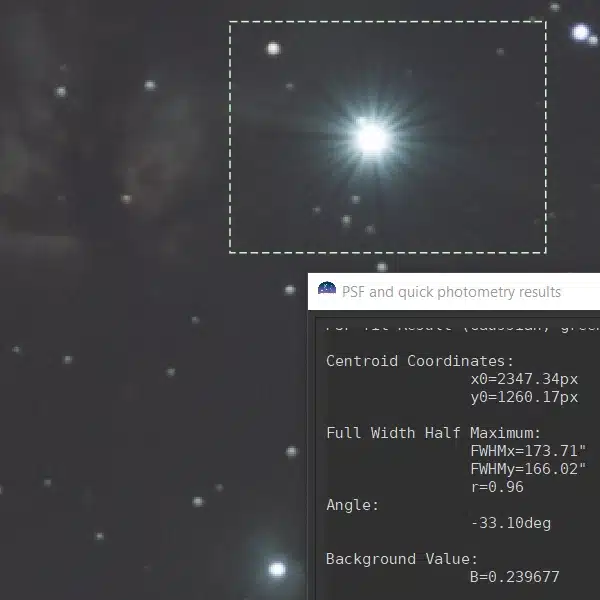
I should also mention that I’m fighting a little bit of wind tonight, so I need to take everything with a grain of salt. But I managed to take about 100 pictures over the course of a 2-hour session. I reckon that about half of the pictures were of decent quality – ie. little to no star trails. That’s not bad for the first test of the 3D-printed star tracker. I’ll need to do better than this long term, but at least I can see that things are working as designed. Here is the best picture I managed to capture with this test.

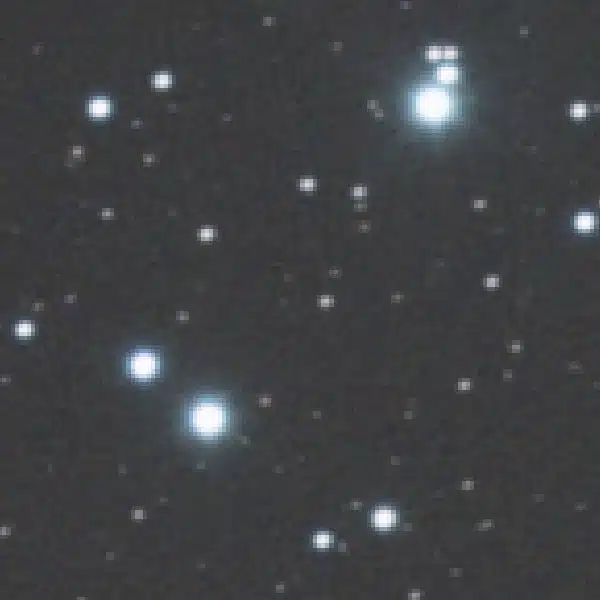
When zooming in at 400%, you can see that the stars remain pretty sharp.

Sad to say though, all was not well during the session. I did notice a fair bit of drift which I’m happy to attribute to polar alignment at this point. I also think that some wind gusts also messed a couple of shots up. And yes, I think the gear smoothness probably introduced a little bit of mechanical vibration in some of my shots. Bottom line, I’ve got some things to work on.
What’s next
I’m rather excited about my first results from the 3D-printed star tracker but as usual, I know I can do better. So I think I’m going to focus on the following challenges next.
- Better solution for polar alignment
- Design a new mount for the camera – need to think about this
- Box up the electronics and update the code
- Find a better solution for balancing the camera – I have some ideas
- Not sure the mini-ball head is going to be up to the task long term
I’d say that’s about it for this update. The good news is that I’m on the right track and I’m definitely excited about getting out again to continue my testing.