![]()


I feel like a little kid at Christmas. The anticipation of getting outside and testing Beta was almost too much to bear. But the day arrived and actually, I’ve had the opportunity to get out a couple of times over the past week. Early testing is always a little nerve-racking. But I’m happy to report that I’ve been generating consistent results thus far and even managed to take my best photo yet of the North American Nebula. Sounds awesome, right? Well, hold your horses, there’s still a lot to process. The most important thing is that I’m outside again and have started testing Star Tracker Beta.
Beta – Does It Work?

I don’t want to beat around the bush. I’m happy to report that testing indicates that Beta is indeed working as a viable star tracker. However, I can also share with you that Beta isn’t exactly living up to my design expectations. But, the fact remains that Beta is a huge step forward for me in my quest to make a DIY star tracker. It’s a journey. And I know that as of right now, I just haven’t arrived at my final destination yet. No worries at all.
Rather than detail each testing session in its own post, I’ve decided that I’m going to walk you through the experiences of the past week. You’ll be able to see what I was observing and what I was thinking as I built up my experience with Beta. Hopefully, you’ll also get a sense of why I love being an engineer. There’s just something about finding cool solutions to unique problems. So buckle up!
Star Tracker Beta’s First Night Out
It wasn’t the best night to head out for sure. But if I look up and see stars, I’m going to be outside! It had rained heavily for most of the day and the temperature was falling quickly. That’s a recipe for a lot of haze. And it was very, very, hazy. My rig was soaked by the time I headed back inside for the night.
Setting Star Tracker Beta up for the first time was frustratingly easy. I mean it. Something about the way I designed the tracker just worked. I went out into the backyard, plopped my tripod on a level platform, attached the main housing to the Omegon Polar Wedge, slid the camera mount into place, slid the counterweight onto the camera mount, and then attached the camera to the camera mount. Each step of the setup was logical and quickly executed. That left me standing there thinking – huh, that was easy. Because within 3 minutes I got set up and balanced. Seems a little too easy…
Polar alignment with the Omegon Polar Wedge was a breeze. First time out and I was excellently polar aligned within 5 minutes. I felt like I was living in the Twilight Zone. But that was it. Nothing to do but start shooting. I positioned the camera to focus on Deneb as it’s an easy target to shoot and is rising nicely in the East. Then turned the tracker on and started imaging.
Session Observations
Intently focused on my monitor, I waited for my first 30-second exposure to come up. It was crap. But that was expected as I need to wait for a couple of exposures while the gears fully engage. The next two shots were equally rubbish. But then, pinpoint stars. You can imagine my jubilation. OK, let’s see if the next shot shows the same… It does! Whoo Hoo! I did it!
My time on cloud nine was short-lived. Deneb apparently didn’t like where he was sitting and decided to take a little stroll around the neighborhood. He walked pretty quickly up. Then looked around and started walking down again. Stayed put for a good image or two. Then more strolling around. What is going on?
OK, let’s start documenting things. I’m hearing a really good knock coming from Beta that seems to be cyclical and repeats every couple of minutes. Something must be misaligned. But there doesn’t seem to be any patterns in the images that are coming up on the screen. Well, I checked everything over really well and couldn’t find any other glaring technical/mechanical issues so I just let Astro Photography Tool rip off another 120 shots. I’ll figure things out when I get back inside.
Image Review and Questions
Zooming into my photos I could still see a lot of slip-and-stick movement in my images. Even though the gears were sanded smooth, with the weight of the rig the gears must still want to hold their position rather than move. That was really all I could see. There didn’t seem to be any rhyme or reason for the inconsistency of the shots. Weird. And out of 140 photos taken, I can tell you that I was only able to keep 26 for stacking. That’s a success rate of 18.6%. In other words, not good. But let’s see what came of it.

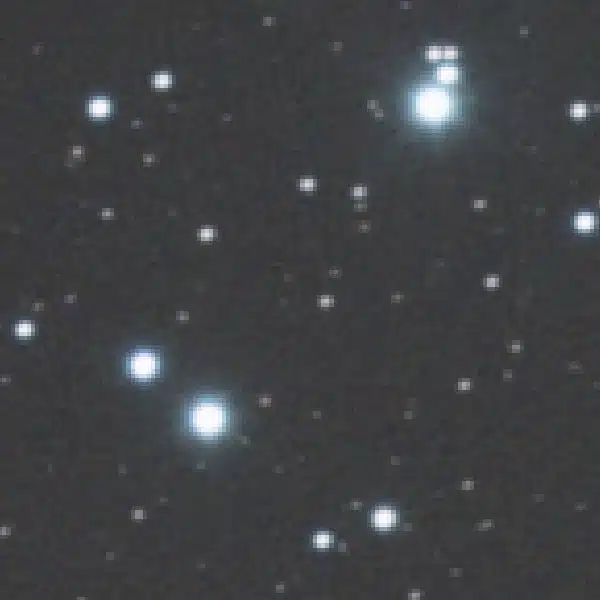
Well, this was unexpected. With a measly 13-minute integration and no calibration frames, I was able to capture features of the North American Nebula that I’ve never captured before. I chalk this up mostly to the use of the Optilong L-Pro clip-in filter. But man, I was shocked. Back on cloud nine. However, now I need to figure out how to get better results with Beta. So I formed a series of questions, thoughts, and actions to complete before my next night out.
| No. | Question | Initial Thought |
| 1. | Was the tracker properly balanced? | Not sure |
| 2. | Was the polar alignment off? | Not likely as the star trails were perfectly aligned with the RA axis. |
| 3. | Is the motor working properly? | The knocking sound is problematic |
| 4. | Was the main worm gear printed well? | From visual inspection, it appears that there is a bit of skew in the base of the worm gear. Enough to knock out of whack? |
| 5. | Was the wind impacting the operation of the tracker? | Maybe. Would explain the random nature of the errors. But there wasn’t that much wind… |
| 6. | Is the motor getting enough current? | I’m sharing the supply between the Nano and the stepper motor driver. Maybe the stepper motor is not getting a full 500mA per channel. |
| 7. | Took a while for the gears to all engage. How can I fix this? | I can write a bit of code to prime the tracker and engage the gears. |
| 8. | Observing a little more backlash in the gears than expected. Why? | There is a bit of slack between the fused gear and the top lid. I can reprint the lid to take up that slack. |
The motor was the most worrying observation from my first testing of Star Tracker Beta. So I swapped the stepper motor with the stepper motor from Alpha. Since I’m going to have to take everything apart, I might as well reprint the main worm gear. So I did. I also went ahead and checked the continuity of all the stepper motor wires and everything checked out OK. Finally, I wrote a little piece of code that would run the main worm gear forward and backward one rotation before starting to track. This should take up most of the slack in the gear train.
Second Night Testing Star Tracker Beta
Another clear night. Now I’m ready to run my second tracking test. I decided I was going to do things a little bit differently for the second test. Rather than mount the tracker on a level table, I would tie the tripod to the ground using a lawn screw and a couple of short bungee cords. Because this will ensure that I’m working from a stable platform and able to balance everything properly.
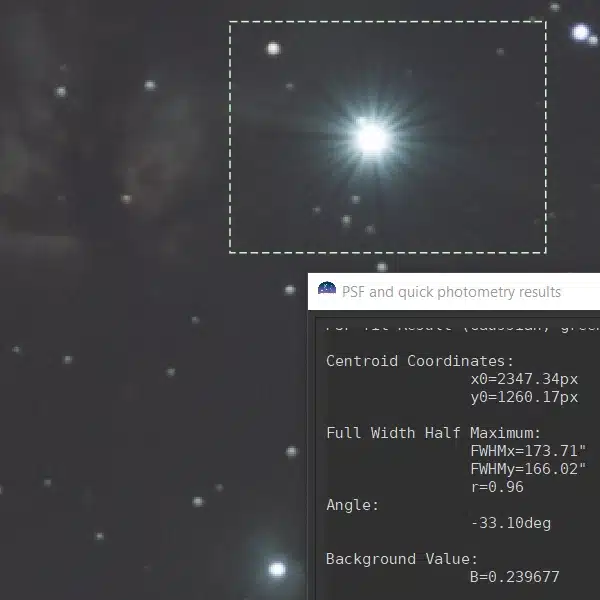
The results from the second night of testing were better. But they still were far from perfect. So, it’s time for a few more tweaks. I did see something interesting in the photos though that offered a clue as to what is going on. I calculated that untracked, a star would trail in my photos for about 50 pixels over the course of 30 seconds. So imagine my surprise to see a couple of photos where the star trails were measured at 75 pixels or 50% more than expected! I’m tracking ahead? It does not make sense.
Unresolved Questions and Actions
| No. | Question | Initial Thought |
| 1. | Backlash is still very unnerving | Need to go ahead and print a new top lid. |
| 2. | The knocking sound is gone | Yay, fix is successful |
| 3. | Gears engaged from the start | Yay, fix is successful |
| 4. | Is the stepper motor skipping or regressing? | Unclear |
| 5. | Was the wind impacting the operation of the tracker? | Maybe. Still can’t rule this out. |
| 6. | The tracker is tracking too fast in some photos | How can this be? |
| 7. | I’m still seeing some slip-and-stick herky-jerky movement in the photos. | Should I add a little silicone grease to the gears? |
After the second night of testing, I went ahead and printed a new top lid for Star Tracker Beta. Let’s just get the backlash issue under control so for nothing else I can cross this off the list. Then, I went ahead and lubed the crap out of the gears with a generous amount of silicone grease. Let’s see how that works.
Third Night Testing Star Tracker Beta
This is a bit of lather, rinse, repeat. I set everything up the same way as before with one big exception. I ran two power supplies to Beta. This is so I can isolate the Nano chip and the stepper motor driver to ensure that the current draw isn’t causing my issues.
Tonight, I did notice a few minor differences in the photos. First, the slip-and-stick movement in the images has disappeared. Don’t get too excited though. All this means is that the star trails are now clean straight lines instead of dotted tick, tick, tick lines. Well, that’s an improvement nonetheless. But why are my stars still wandering all over the place most of the time?
Oh no. I think I know what is going on. The penny dropped. I was trying to think about why the error was only occurring in line with the axis of rotation. Obviously, this tells me that the issue lies in how I’m driving the camera. So, I double-checked my results from the previous nights. And sure enough, there is a weak pattern that emerges in the results. This pattern has a name – it’s called periodic error.
The Problem with Periodic Error
I expected periodic errors. After all, I’m 3D printing the gears. Inherently, the tolerances are going to result in minor cyclical deviations in my photos. My problem isn’t that I didn’t expect this. It’s that I didn’t think about how these errors would propagate when compounding worm gears in my drive train. Oh no indeed. You see, when you change the tooth profile of a worm gear (either through printing or sanding), these minor deviations have the unintended effect of speeding up and slowing down the output.
My primary worm gear has a period of approximately 338 seconds. That’s how long it takes to complete one rotation at the input. As for my secondary worm gear, it has a period of approximately 5408 seconds. Oh no. At 135mm, each pixel represents about 3.5 arcseconds. But I’m seeing movements in single photos of up to 300 arcseconds. That makes my photos unusable. And these errors are periodic. But I need to know exactly how bad the problem is. So, let’s go ahead and plot it.

I have to laugh. Because I totally overlooked this possibility in my design. Roughly, I’m seeing a peak-to-peak variation over the full rotation of the worm gears of 400 pixels. This is important because that translates to 1400 arcseconds error peak-to-peak. Is that bad? Well, yeah! Especially considering that most entry-level trackers will deliver about 150-arcsecond error peak-to-peak. Star Tracker Beta is 9 times worse!!! Besides, I haven’t even begun to quantify the constructive and destructive errors from compounding the worm gears. Suddenly, I’m not feeling so good…
What I Know Right Now
Star Tracker Beta is working fine. It’s a solid creation. But right now, I’m thinking it’s not going to be accurate enough to shoot with the 135mm lens and deliver the kind of results I want. So where do I go from here? First, I can test Star Tracker Beta with the 50mm lens. Why? Because this lens will be far less impacted by the periodic error. It’ll still be rough, but it won’t be as noticeable. And maybe I’ll learn something new about this issue. Second, I can try to shorten my exposure time with the 135mm lens which will minimize some of the effects in the photos. I can also stop down a little bit which will help. But these solutions are simply workarounds. Like making lemonade when handed a bunch of lemons.
I think I have 2 options at this point. First, I can print a new fused gear and take better care when sanding it. Maybe that will be enough to save this design. It’s worth a shot but I’m pretty sure this won’t make much of a difference. That’s because I might be able to achieve 200 pixels peak-to-peak at best. Second, I can redesign the worm gear train and only use 1 worm gear. But I’m not excited at all to do this. A single worm gear approach or involute gear train will be big. Exactly the opposite of what I’m trying to accomplish with Star Tracker Beta.
So, I’m stuck at the moment. I’ll keep testing and tweaking Beta, but I’m fairly confident that I’ll be redesigning a major portion of Beta. And I’m actually surprised I didn’t pick this up as significantly with Alpha. I guess I just didn’t test Alpha enough… The good news though, I’ll be able to reuse a lot of the components from Beta in the next go around. Yeah, let’s find that silver lining amongst the storm clouds!
Ok, that’s all for now. More once I get a chance to do a little more testing.