I had a plan. A little break in the weather was all the time I needed to head out and test the next-generation star tracker or 8-Track. Or if you’re talking to my son, Snorlax. I had simple goals. Continue refining my N.I.N.A. process and put the new star tracker through its paces. For the test, I decided to use the 50mm lens because I’ve found that the broader field of view can help troubleshoot tracker issues. And needless to say, I had a lot of issues. I’m reminded again that this hobby is not for those who lack patience and resolve. So while I was a bit put out by my results, I decided to write about troubleshooting my star tracker design just to show that more often than not, things do not go as planned. But that’s just part of the hobby.
A Little Slice of Humble Pie
I was so excited after printing and assembling 8-Track. So excited in fact that I threw caution to the wind and wrote about it in my last post before actually testing it. After all, I was confident it would work based on the results of my test rig. This was in spite of the fact that I modified a fair number of pieces in the meantime. It’ll work I told myself. And it kinda did, but not really – you know? Facepalm…
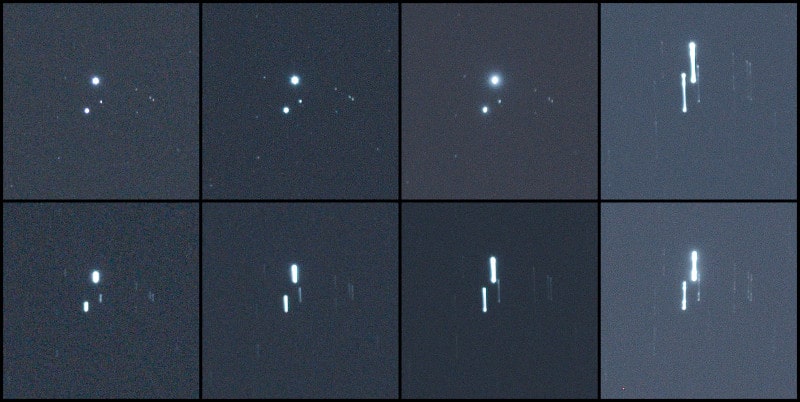
I took 4, 10-minute sequences for the following exposure times: 15, 30, 60, and 120 seconds. And for good measure, I repeated this test a second time. Inconsistent is the best way I can describe my results. I wasn’t expecting much for the 60 and 120-second tests. But I had high hopes for the 15 and 30-second exposures. Below you can see a collage of the best and worst raw photos for each sequence.

What I Observed
I started troubleshooting the star tracker by documenting what I observed. The tracker timing appeared to be fine. And the stepper motor was warm but not overheating which was what I was expecting. That’s all good. But the stars in more than half of my test images were really jittery and jerky. I suppose I can begin to troubleshoot by breaking things down into two categories. Internal and external factors.
For internal factors, I should consider:
- Are the gears too tight or too loose?
- Is the locking mount pulling any of the gears out of alignment?
- Is there a goober in the gearbox?
- Maybe the rig wasn’t balanced well?
- Are bearings clogged or stuck?
Contributing external factors could be:
- Hanging cables messing things up?
- Wind?
- Are cables getting snagged on anything?
That’s about all I can think of at the moment so let’s start ripping through these.
What Makes Sense
My hunch is that the gears in the gearbox may be misaligned or a little too loose. I added a bit of clearance to the gears to give them a comfortable amount of wiggle room. Because the 28BYJ-48 stepper motor only has 32mN of torque. In other words, this is not the kind of motor that is going to power through minor imperfections in the gears. So this is a pretty easy fix. just print tighter gears. I’ll just need to wait about 4 hours for the new planets to print. Ok, what’s next?
The locking mount looked fine and I don’t see any evidence that this is the culprit. Shame though. Because that would also be a pretty quick fix. I also observed that the gearbox looked fine. No floaters in the gearbox. I cleared all the bearings and they are working as needed.
Balance was definitely an issue. That could be the whole story but I wasn’t entirely convinced. My cables are also a big problem and so this weekend I’ll pick up a cheap USB hub and work on a cabling solution. Even though the cables were hanging, they weren’t snagging on anything. So cross that off the list. And there was a little breeze, but not anything that would cause the results I’m seeing, even with those crazy hanging cables.
So my best bet after troubleshooting the star tracker is that the photo jitter is emanating from somewhere in the gear train.
Testing New Gears
A scant four hours-ish later, I popped a new set of gears into 8-Track and put it back together. I then whipped up a little code just to drive the tracker back and forth. This was so I could ensure that the mighty (*ahem) 28BYJ-48 could actually drive the tighter meshing gears. Power on.
I was pleasantly surprised that the stepper motor drove the tracker without stalling. But watching the output shaft, I could see very clearly that the rotation was not consistent. It would move smoothly for a bit, and then hop forward. Running clockwise and counterclockwise, I observed the same behavior only with the tighter gears, it was more pronounced. Are the gears that I printed that bad? I don’t think so, but…
OK, the good news is that I found the problem. Now to figure out what is causing it. Nothing sprang to the front of my mind so I decided to start from the beginning. By looking at my planetary gearbox calculations. I love maths…
A Second Helping of Humble Pie

55 minus 17 equals 36. Right? Wait, What? 38. Oh no! No. No. No. No. No. I can’t be that daft. Well, yeah, apparently I can be…
There are a few rules when building planetary gearboxes that need to be followed. One, the number of teeth on any given gear needs to be greater than 17 if you want to avoid undercutting. Two, the sum of teeth on the ring gear and the sun gear divided by 2 must equal the sum of the teeth of the sun gear and planet gear. And Three, the number of teeth on the ring gear minus the number of teeth on the sun gear must be evenly divisible (ie. an integer number) by the number of planets in the gearbox. These rules apply to all gear stages.
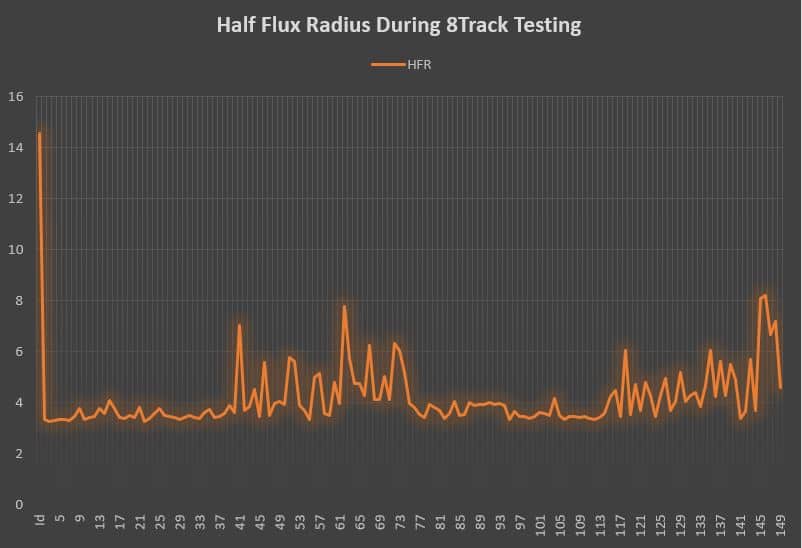
Rules one and two pass fine for both gear stages in my design. But rule three fails for my L1 stage. My ring gear has 55 teeth and my sun gear has 17. There are 4 planets in the system. (55-17)/4 = 9.5. Oh no, I wrote down 36 which is divisible by 4. In case you are confused, you need to have an integer number because you can’t have a fraction of a gear tooth. You can only have an integer number of gear teeth. So I believe what is happening is that the gears are binding up in the L1 stage because they’re not meshing properly and then popping forward when the force is great enough. Oh stink… This makes sense if I look at a plot of the Half Flux Radius of stars over my session.

I think this is a pretty compelling visualization of the erratic behavior of the star tracker. This means I’ll be redesigning the gearbox and doing a lot of time-consuming printing over the coming days. At least the task is made a bit easier using the Planetary Gear Generator website. But the moral of today’s story is – Always double-check your maths!
Where to From Here
OK, so I’ve learned a lot through troubleshooting the star tracker. I need a new gear train. And wouldn’t you know? I’ve already found a reduction that will size well with the rest of my design. I’ll have to change the stage modules, but that won’t be a problem. And yes, I’ve double and triple-checked my maths. So I need to print all new gears but I’ll be able to keep the rest of my design. That’s what’s on tap for this weekend. And hopefully, after this, everything will work a treat.
Also, I think I will go ahead and figure out a cable management strategy for my imaging sessions. It’s not a critical issue for me right now. But I am planning on writing a couple of ASCOM drivers for the Samyang 135mm Focuser and the 8-Track star tracker. I’ll need a couple more cables to accomplish this which means it will become unwieldy.
Finally, I have quite a few notes on my second go with N.I.N.A. that I want to share but I think I’ll save these for a future post. As not to leave you hanging, it went better (which I expected) but I did encounter a few new quirks. But nothing to the point of souring my experience thus far.
