![]()


Best Results to Date with the Lego Star Tracker
Conditions were far from ideal but there was enough of a break in the clouds to cram in a quick test of the Lego Star Tracker version 6. Seriously, in the entire month of November, there was only one clear night that was suitable for imaging. Well, that’s how it goes in these parts I suppose… But hey, a test is a test and I was able to learn a lot. My results tell me I’m not quite there yet, but I’ve made significant progress and despite the challenges that I faced this evening with the tracker, I had the most consistent and best results with the tracker to date.
About Those Challenges…
There was a very high thin veil of clouds to the North and the moon was still more than half full. Lots of moisture plus lots of light equals a lot of difficulties. In fact, I had to actually give up on finding Polaris to perform an alignment. I did the best I could by crudely drift aligning. The chilly 2-degree temperature didn’t help much either. But hey, when you can only get out once a month, you take what you can get.
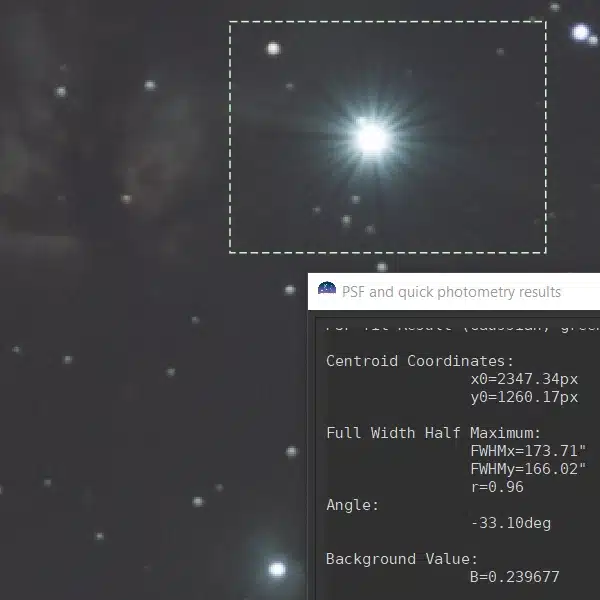
Tracking Cassiopeia – 11/24/21
I knew I was going to be stuffed on my polar alignment, but I actually dialed it in fairly close. You can see a bit of distortion and trailing in the final images, but not as much as I feared. I must have fussed with the alignment for a good 45 minutes and was running out of time in my race with the clouds to actually start imaging.
Ultimately, I decided to shoot 60-second exposures at f/4 and an ISO of 800. By this time, I figured I could set it all up and get 20 photos in before the conditions deteriorated to the point of futility. And that’s pretty much how it played out. You’ll see a zoomed-in image of Shedar below.

I was pleasantly surprised by the results of this short imaging session. With the past versions, I really struggled to get consistent photos. I’d be happy if I could keep 7 out of every 10 photos to take into Deep Sky Stacker. But tonight, I took 20 photos and I was able to keep all 20 photos for stacking! That was a huge goal for this version of the tracker and while I know it’s still a bit too finicky for my liking, that is an encouraging outcome.
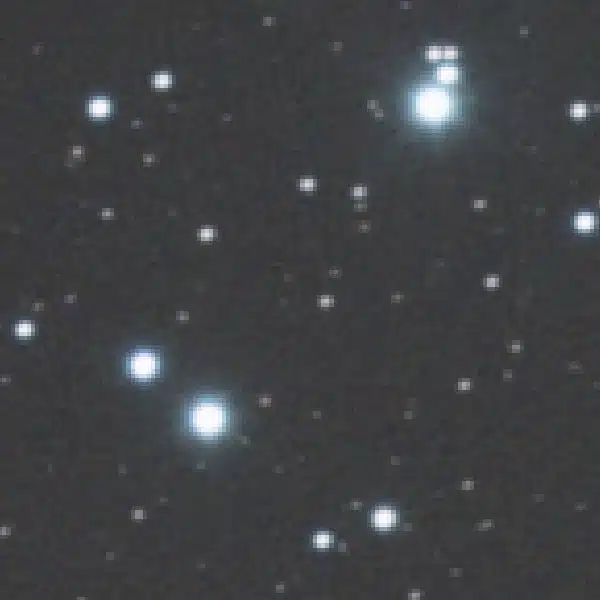
Here is a stacked shot I was able to capture of Cassiopeia. I’d say this is a pretty big improvement over my last Cassiopeia photo.

With all the issues and limited time I spent imaging, I was surprised that you can actually begin to make out the Gamma Nebula, Pacman Nebula, Dragonfly Cluster, and whispers of the Heart and Soul Nebula. I may take another crack at this region the next time I get out for testing as it is a pretty busy and exciting area of the sky to photograph.
Lessons Learned
It’s not progress if you don’t learn anything. I made a lot of progress tonight. Here’s a quick recap of my takeaways.
What worked well
- I finally got my focus right
- Excellent consistency photo to photo.
- Tracking movement was very smooth
What didn’t
- It’s a bit tricky to adjust the camera position
- Balance is not right when the camera is in certain positions
- Overall balance drifts over time
- Polar alignment was poor (conditions)
- Still a little bit too much flex in the load arm (hmmm – running out of ideas)
What I can fix
- Add more pulley wheels to the base to support the load arm better
- Perhaps add bands to the pulley wheels to add grip
- Need to ensure some slack exists in the output worm gear – too tight is not good.
- More support on the top as well?
- Load arm redesign?
Overall, I’m quite happy with the results and these are the best results I’ve had with the Lego Star Tracker. I made some minor tweaks by adding more pulley wheels with bands to hopefully give the load arm more support and we’ll see how that works in my next session. As for the balance issues I’m still seeing, I think this is more a function of the base design at this point. I’m going to hold off on changing anything there for now, but this will probably require my attention sooner rather than later. That’s a bummer because I like how the base design works, but if it’s not stable, it needs to be fixed.
Alright, that’s all for now. Until the next test which hopefully won’t need to be another month from now…