OK, things are getting real with Star Tracker Beta as I move on to designing and printing the tracker counterweight. Why start here? Well, since I’ve decided to use an aluminum tube for the counterweight rod, I need to come up with a strategy to hold the weight in place while I’m imaging. With any luck, I’ll be able to use the same or a similar system for the camera mount design. Once I get past this hurdle, I’ll be able to see the light at the end of the tunnel in getting Star Tracker Beta to an MVP state. How excellent!
Counterweight Design Considerations
There are a number of points that I want to consider when designing the counterweight strategy for Star Tracker Beta. First, I want to be more precise with how much weight I have on the bar. I’ll start with designing a 1kg weight and then in the future, I’ll design a 0.5kg weight. Second, I need to be able to fix the weight in place on the rod. And I’d like to do this without having to screw into the soft aluminum rod. Third, I will design with real tight tolerances to keep the weights as stable as possible so they don’t shift around when I am imaging. And finally, I want the counterweight to be completely enclosed. This will lend itself to portability.
Standardizing the Weight
The first criterion is easy enough to achieve. The steel washers that I’ve been using weigh 70g each. So if I use 15 washers, that will take me just over 1kg. I’m fine with that. I spent a nanosecond thinking about molding a lead weight. But it’s lead. So there you go, I’ve made the environmentally conscious decision to stick with steel. Now give me my plastic straw back!
Rod Attachment
This ends up being the million-dollar question for the whole star tracker project. How can I firmly lock elements in place without screwing them down on their rods? The aluminum is just too soft and gets really chewed up by screws. But there are components in my design that will need to be allowed to move freely when I want them to. For example, I want to be able to slide the counterweight up and down the shaft to make fine balance adjustments. What a conundrum!

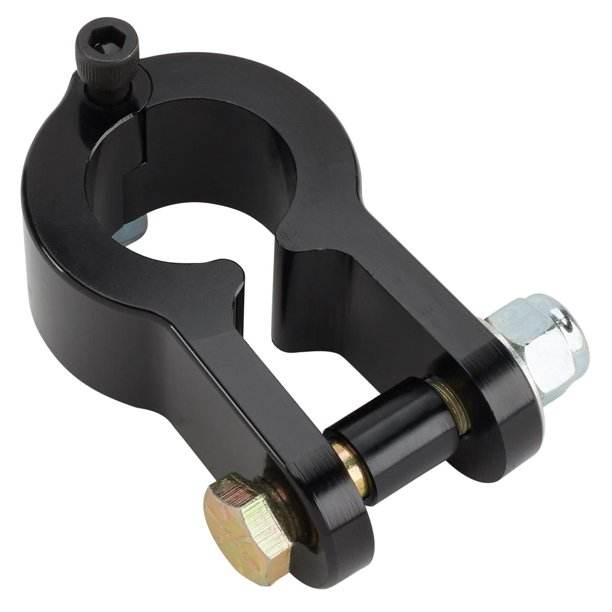
After doing a little research online, I decided to try to design something like the tube clamp pictured here. This way, when the screw is loose, the counterweight can move freely. But when I tighten the screw, the clamp elements tighten down and “lock” onto the rod. I’ll be honest with you though. At first, I wanted to design a quick-release type mechanism – and I failed miserably. Here, the plastic was too flexible to allow the lever to lock in. It kept popping open in my original design. That would be a disaster during imaging. Never mind the pictures, that much weight breaking free would definitely put my camera and lens in harm’s way.
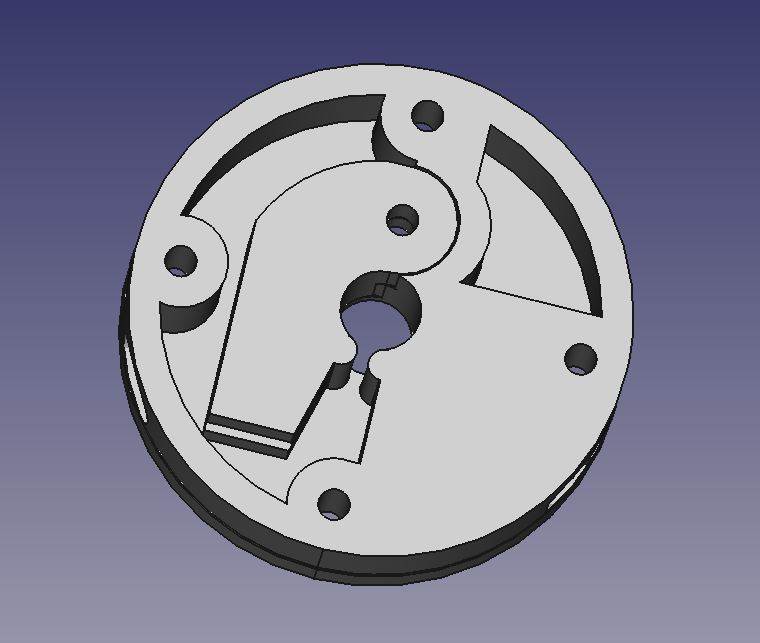
This seems like a good strategy. I can put a spring on the locking screw so that when I loosen the knob, it will push itself open and release its hold. Groovy! Here’s a look at the FreeCAD design for the base of the counterweight system.

Tolerances
The worst thing that can happen once I begin an imaging session is that my counterweight starts shifting. Let’s face it, steel washers are not exactly precision-engineered parts. They each have their own little quirks and features that make them unique. This means their weight might not be evenly distributed throughout their whole body. Since the weights will seek to find their lowest potential energy, they may shift (ie. spin) during imaging. Bad, bad, bad, bad, bad. I want to make sure these suckers stay put!
So, I’m designing very tight tolerances for the inner bore and the outer shell of the Star Tracker Beta’s counterweight. There won’t be much movement when I put the rings on the counterweight shaft. I actually expect I may need to press fit some of them into place. GOOD!
External Casing
And speaking of external casing… Yes, I want to completely encase the counterweight. There are two reasons for this. First, I want the counterweight to essentially be one piece. That will help with fixing it in place, traveling, etc. The second reason is appearance. Let’s face it, there is nothing attractive about steel washers. So let’s get those homely little guys covered up!
Assembling the Star Tracker Beta Counterweight
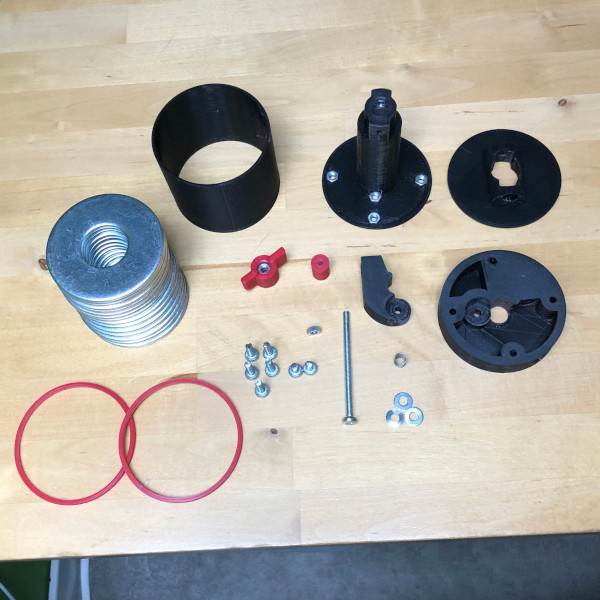
Now the fun part. Below is a picture of all the pieces for the counterweight. Pictured are (15) steel washers, (8) M4 screws, (10) M4 hex nuts, (3) M4 washers, (1) spring, (1) 3D-printed knob, (1) 3D-printed knob screw sheath, (1) 3D-printed counterweight base, (1) 3D-printed counterweight lever, (1) 3D-printed counterweight housing base, (1) 3D-printed counterweight lid, (1) 3D-printed counterweight sheath, and (2) counterweight rings.

Two things to note here. First, you’ll see from the picture above that most of the hex screws have been already press-fit onto the 3D-printed parts. I was trying to decide as to whether or not I wanted to take them all off for the photo. However, I want these to be tight fits, so it just didn’t make sense to do so. Second, I had some camera issues when taking photos of the parts and didn’t realize this until after I finished putting the counterweight together. Doh. Again, I’m not going to take it apart, but that means I won’t be providing detailed build instructions for the Star Tracker Beta’s counterweight assembly.
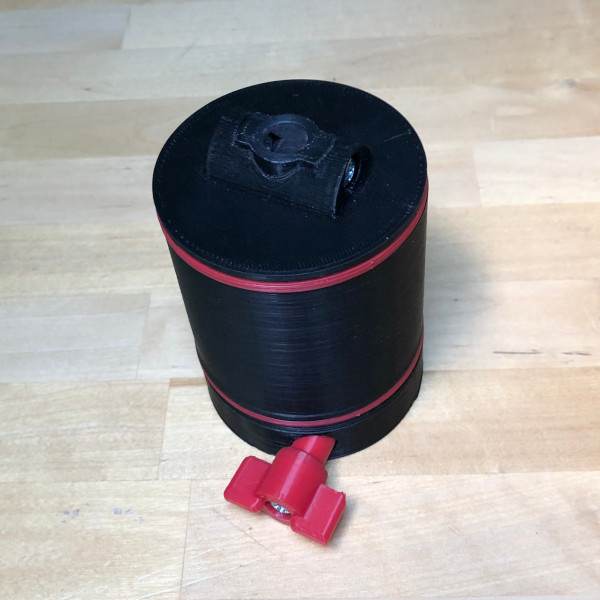
If you really want more details about anything, just leave a comment and I’ll provide more information. That said, here is a picture of the Star Tracker Beta counterweight after full assembly.

Entering the Home Stretch
This is a beefy part and I’m very pleased with how it turned out. It definitely exceeded my expectations in terms of quality feel. It’s solid and I won’t have any problems tossing this in my bag when I head outside.
To use the counterweight I simply need to slide this onto the aluminum counterweight rod and lock it in place by tightening the knob. The knob controls the force of the clamp on the counterweight rod. When the knob screw is loosened, the spring pushes the lever back to allow the counterweight to freely move again. I’ve actually left the bore through the center of the counterweight as a tight fit. For now, this makes it a little more difficult to move up and down the rod. But I know in time that this will loosen up and this isn’t a part where I want some play in its fit.
I only have one more component to complete before I can begin testing. And I’m very excited about this. As an added bonus, it’s probably the coolest part of Star Tracker Beta yet. That is, of course, the camera mount. Keep an eye out soon for that post.
