![]()

I was a bit dubious when my weather app informed me that we had clear skies. However, a quick peek out the window with my lights out confirmed the message. To be honest, I wasn’t prepared or planning to be taking photos this evening. But as the moon hadn’t risen yet and the skies were the clearest I’ve seen them in months I quickly sprang into action. I grabbed my camera, tripod, dew heater, and computer and set up shop on my back porch. Tonight is the perfect night to continue my testing to see if I can capture any Rosette Nebula detail using an untracked setup!
Imaging Plan
I’ll be shooting Rosette Nebula untracked tonight with the Samyang 135mm f/2 lens. This means I’ll just be using my camera and tripod to take lots of short exposure time photographs. What I’m really trying to determine are the limits of what I can image with such a bare-bones rig – especially when shooting from a Bortle 6 zone in terms of light pollution.
As I discussed in a previous post, the plan is to open the aperture to the max on the Samyang 135mm which is f/2. This gives me the maximum signal gathering opportunity. I’m going to go with 1-second exposures this evening. I know previously that I discussed shooting at 0.8 seconds, however, in Astro Photography Tool (APT), there is some weird dynamic that is preventing me from getting consistent results using 0.8-second exposure time. I’ll need to investigate this further, but not tonight. Tonight, I just want to rip off as many exposures as I can to take advantage of the conditions.
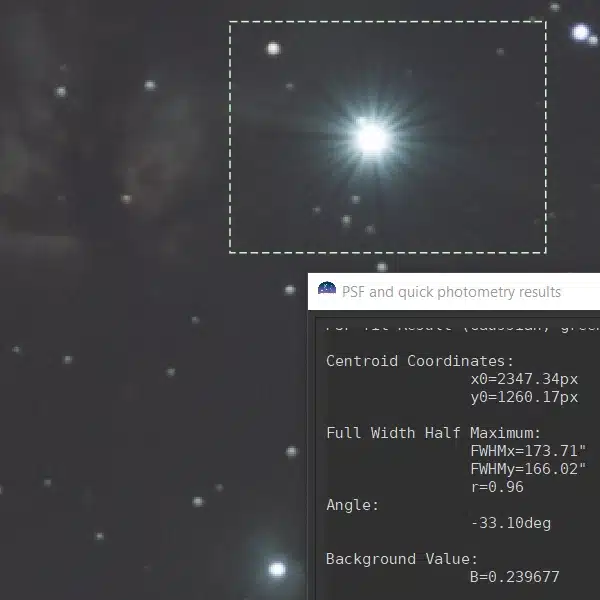
After getting focused using the Bahtinov mask while pointing at Betelgeuse, I centered up where the Rosette Nebula should be and ran a couple of test shots. For tonight’s session, an ISO setting of 6400 seems to be the lowest I can go while balancing the histogram. Perfect, I’m all set.
I set the APT program to take 50 exposures per run. Then I’ll reframe the Rosette Nebula in the shot and go again. I didn’t have a set limit of exposures in mind but figured I’d go until the weather gave out or my card filled up. I also wanted to leave enough card space to take flat and dark bias frames.
How’d It Go?
I managed to take 1300 light frame shots along with 50 darks and 40 flats. I had planned to take 50 flats but must have gotten distracted when I was counting photos. Oh well. I also slurped in 60 bias frames and 60 because – yes, I can’t count. All in all, I spent about 2 hours imaging which seemed to be about right for tonight because the moon was just getting ready to rise by the time I finished.
A quick peek at the photos showed all was well. I have to say, I’m really amazed at what a difference using a Bahtinov mask makes. As I’ve gotten more accustomed to using it, my focusing time has gotten shorter and shorter. And the results have been bang on.
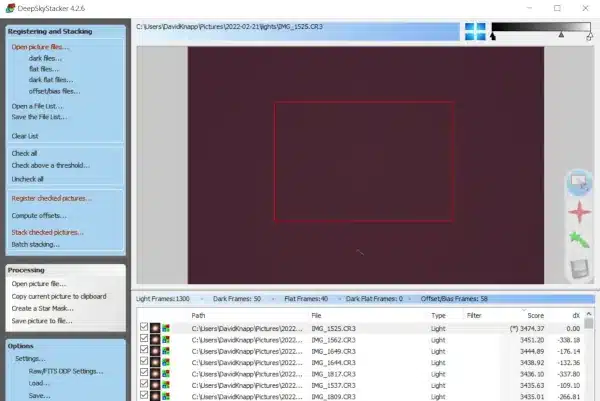
I went ahead and processed the photos in Deep Sky Stacker per my usual routine. I did make one small change right before I started stacking the photos though. Once I selected my reference frame, I knew the Rosette Nebula would be in the center of my shot. I decided to use the feature in Deep Sky Stacker that lets me specify the region of my photo that I wanted to stack. This has the result of dramatically reducing the processing time. It also eliminated the need for me to crop the final result. Double bonus!
Now it’s time to start post-processing the final image
Post-Processing in Siril and Gimp
I fired up Siril and loaded my stacked image. Today I was just interested in setting the color calibration, doing a background extraction, and then removing the green noise. The trick is to remember that during the background extraction, you want to avoid touching any part of the photo that contains the nebula you’re photographing. Removing the green noise simply cancels out the fact that the green channel is stronger than the other channels on account of there being 2 green pixel sensors for every blue and red in the sensor array.
When in Doubt, Find a Tutorial
Now it’s time to finish the photo in GIMP. I feel like upping my game a little bit on the post-processing side so I’ll need some help. Fortunately, I found a great little YouTube video to help me add a few new tools to my processing toolbelt. Nico Carver of the Nebula Photos channel processed the Andromeda galaxy using Siril and GIMP. While I’m shooting a nebula and not a galaxy, many of the same processing principles apply.
Starnet++
One new processing tool mentioned in this video is Starnet++. This is a program that takes your photo and strips out the stars. Why would you want to do this? Well, for photos of nebula and galaxies and the like, it’s easier to post-process the stars and the nebulosity separately. The big advantage is that you can really highlight the nebulosity without blowing out your stars and background. Now, I wanted to share a link to the Starnet++ tool, but for whatever reason, the links were all broken. I believe this is probably temporary. Needless to say, I had downloaded this tool a while ago and just never got around to using it. The important thing is that I had it available to use. I’ll check again soon to see if the links come back. I hope so because it’s a nifty little tool.
Putting it All Together
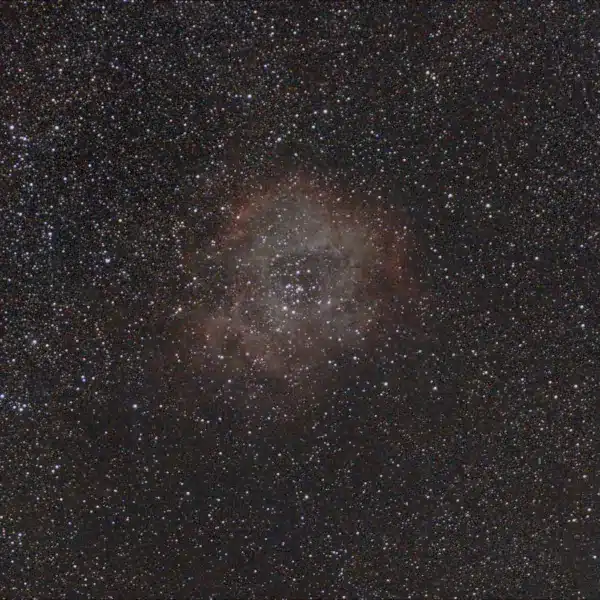
I followed Nico’s tutorial to the letter. He really does a good job explaining what to do and how to do it. Frankly, I was surprised at how well the resulting image was. Mind you, I’m shooting the Rosette Nebula from a Bortle 6 zone using an untracked setup and without any fancy filters or anything. I say this only to remind folks that it’s important to have realistic expectations about what you’re going to be able to capture. For me, this is still new (relatively speaking) and any opportunity I have to learn something new and grow in the hobby is a joy. So without further ado, here is my final picture from last night. Not bad for just over 20 minutes of integration time!

What’s Next?
Well, if lightning strikes twice and I have another opportunity to get out, I may take another crack at the Witchhead Nebula. If not, I’ll probably have another go at the Orion nebula. We’ll see. Though I think that I’ve learned that this is about as small a feature as I’d be comfortable shooting at 135mm. This will probably be my standard from here on out.
Another thing I might try to do is stack this sequence again using a 2x drizzle. Then I can post-process the same way and compare the resulting outputs. That might be interesting to try.
I’m always open to other thoughts and ideas on what to image and yes, I’m still hoping to get back outside with the Lego Star Tracker again soon.