![]()


Finally Some Good Results with the Tracker
I’ve been intently staring at the weather forecast for the past 9 days just itching for an opportunity to get out and test out version 5 of the Lego Star Tracker. Unfortunately, the weather has been exceedingly fickle. We’ve had patches of sun during the day, but by the time evening falls, we’ve been socked in with clouds. Big-time bummer! But once I caught a break in the clouds, I was delighted to see that this version of the tracker produced good results.
So, in the brief respite we got from our gloomy grey environment, I scurried out into the backyard to get set up. It’s just about a full moon and there is a blanket of high clouds in the atmosphere but tonight is all about simply testing the tracking ability of the new design. I can live with these conditions for testing.
Getting Set Up
I started by roughly aligning the base and setting the camera angle towards Deneb in Cygnus as this was roughly overhead. I then turned the rig on its side and worked to adjust the counterbalance so that it was nearly balanced with a slight bias given to the camera. I’m also using a rubber band to keep things as stable as possible.
I then righted the rig and performed a quick polar alignment. With the moon so bright, it was actually surprisingly easy to get things adjusted this evening as my cross-hairs were easily visible. I still need to figure out how to improve this for dark sky conditions but for tonight, this was perfect. Fired up the Lego Boost program – and we’re off!
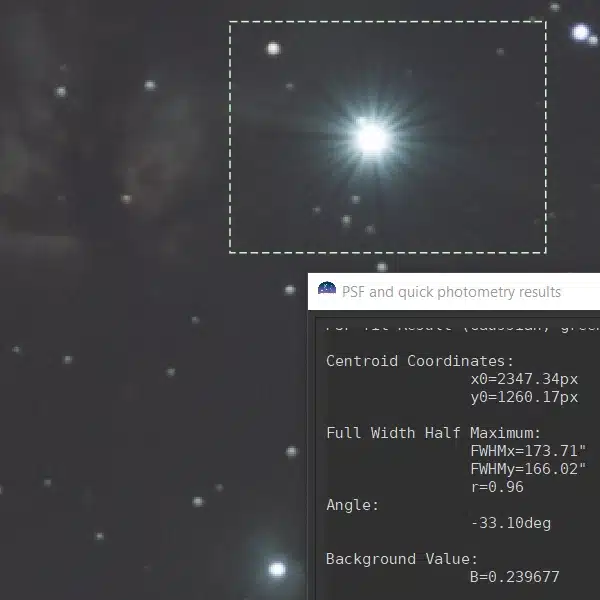
I probably shouldn’t have, but I decided to use APT’s lens control tool to try to achieve focus. I simply picked a star in the field of view and used the controls to dial into the lowest FWHM number I could achieve. Yep, make that definitely shouldn’t have. I did not achieve good focus, but hey, I learned something. And as I’m analyzing my photos, I just reminded myself that I’m testing tracking tonight, not focusing.
Just a quick note. My focusing issue isn’t a reflection on APT’s lens control tool, it was just my first time using it. I’ve since gotten some good practice using this tool and I really, really, really like it!
Shooting Plan
I’ve fallen into a pretty standard routine of taking 15-second photos to make sure I’m roughly polar aligned. The first photo came up and looked great. As the second photo finished, I thought there was a problem with my setup. Nothing on the screen changed. Or so I thought. The same thing happened after the third photo finished – however, the histogram clearly shifted. Wow, I’m tracking!
With everything looking good, I changed my plan up to take 60-second exposures at f/4 with ISO set to 800. The moonlight was going to dominate tonight especially against the high clouds and I wasn’t even going to try to fight it. So I let it rip and here is an image right out of the camera.

Out of the 20 photos that I took, 13 tracked perfectly. There were a few that I know I compromised by bumping my platform. And there were a couple that clearly suffered some kind of mechanical issue. But I’ve got a beat on what was causing that.
At this point, I was completely gobsmacked. I couldn’t believe how effectively this was working. I mean it’s far from perfect but I really wasn’t expecting such smooth operation during my first test with this heavily redesigned version of the tracker. Whoo Hoo!
Feeling Cocky
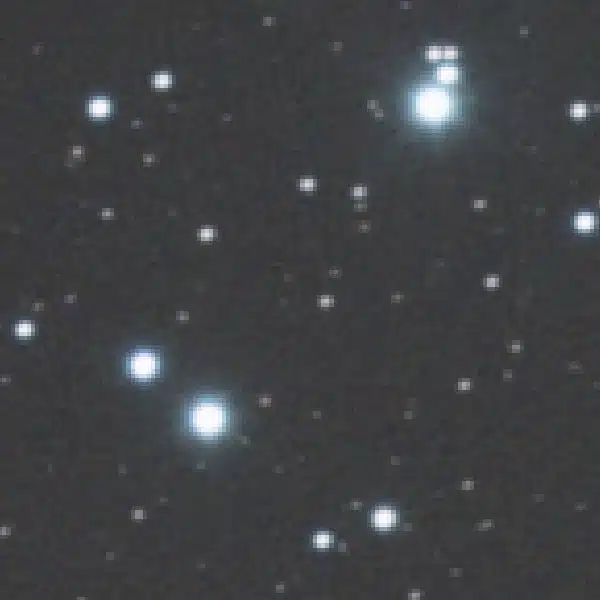
I decided to up the ante and take some 2, 3, and 5-minute exposures. Why not? Well, now after seeing the results, I’m really kicking myself over my poor focus. It tracked well at 2 minutes and here is a zoomed-in image right out of the camera.

At 3 minutes, you can start to see a little bit of tracking error.

And finally, at 5 minutes I took 2 photos. 1 photo showed some skip movement which again I believe is a mechanical issue and the other photo only showed minor tracking error. In fact, it almost looked better than the 3-minute photo.

Here is an untracked 5-minute photo for comparison.

Review and Lessons Learned
Overall, the Lego Star Tracker Version 5 delivered good results and completely exceeded my expectations. I had significant concerns about the new gear train and the overall stability of the rig. I’m happy to report that both of these fears were allayed. The biggest overall surprise was how quickly and easily I got this up and running this evening. Clearly, proper balance correlates significantly to good tracking. Here’s a larger photo of the tracker in action.
I suspect that the mechanical issue that I’m seeing in every few photos is due to worm gear slippage at the output. I have an idea of how to improve the engagement of the worm gear to hopefully eliminate this issue.
Here’s what I think I need to tinker with next
- Improve the base stability
- Improve worm gear engagement on the output
- Find a better location for the finder scope
- Practice the lens control focusing technique – doh!