![]()


Yes, I Bought Batteries
Hopefully, I’ll never repeat that mistake again. And on that note, I think I’ll pop my batteries into my charger right now just to be sure. Anyway, I had to wait about 3 days before getting back out again but that gave me a little time to make another little adjustment. I was rewarded for my effort because I had a real good night tracking.
Basically, I added a linear actuator to my base to be able to adjust the angle of the tracker. This way, I should be able to really dial in the polar alignment. Hopefully, with this change, I’ll get a lot more tracking time tonight. Once again, I’m going to shoot Cygnus and I’ll be looking to shoot 60-second exposures.
Here We Go!
Ok, the usual prep. Focus, set the target, and fire up the tracker. I decided I’m going to pulse a 48 degree move every 2 seconds. I think 24 degrees every second would be a little too aggressive, but perhaps I’ll try that some other time. For now, this all seems to be working OK.
The first shot showed some small trails again, but I’m wondering if I just didn’t allow it enough time to soak. Well, the second photo answered the question and was nearly perfectly tracked. I double-checked the polar alignment and everything looked good.
It’s worth mentioning that I intentionally set the camera so that the center of gravity would be to the right of the rotational axis so that the camera would be held back on the downswing of rotation. I think this just about proves that the tracker is going to struggle to pull the center of gravity up as opposed to letting it fall. This is a big issue that I’m going to have to think about how to fix.
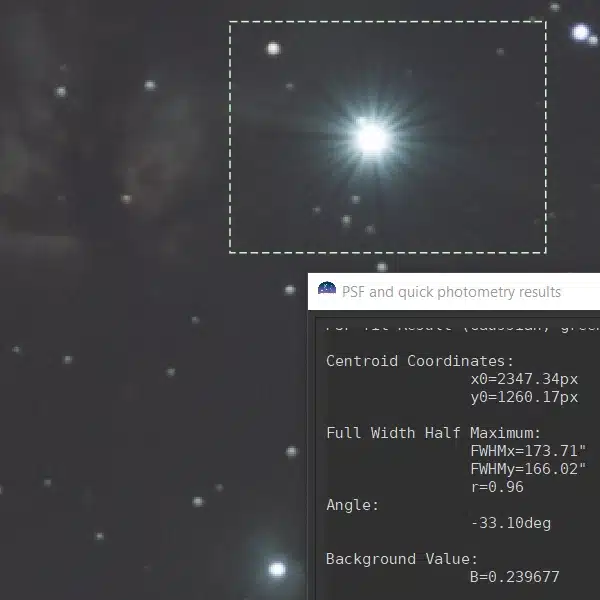
Here’s a look at what I was seeing, right out of the camera once again looking at Deneb.

Here you will notice a little distortion in the stars but to be fair, I was shooting the 50mm lens at f/2.8 and ISO 400 at 60 seconds. Unfortunately, Deneb fell a little outside of the sweet spot of this lens so I’m pretty sure the little aberrations are due to the lens, not the tracker. I wanted to frame it in the center, but it’s a little tricky to zero in on a target (yes, another problem to be fixed).
But you should see the smile on my face right now.
Deneb – 2021/10/02 – Finishing This Tracking Session
I ended up taking about 60 photos at these settings. After looking through all the RAW images, I could see there were some photos where there must have been some sticking, or ticking, or wind, or some minor movement in the system that blurred things up a bit. But if I was to estimate, I was getting about 8 good shots out of every 10. For now, I’ll take that! In my wildest dreams, I could not have imagined having such a good night tracking.
In fact, the results were so good, I went ahead and took dark and flat frames. I really want to see these stacked now!
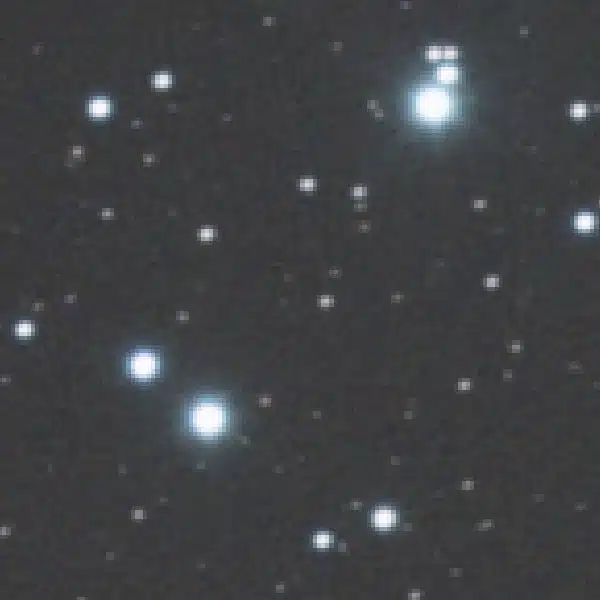
So, I ended up doing a real quick process of these shots and stacked the best 45 photos using Deep Sky Stacker. I performed a few minor adjustments afterward using Siril (background extraction, color calibration, and remove green noise) and then did a quick stretch in GIMP. Below is a png screenshot of the result that I produced.

What I was most excited about was actually being able to begin to see the red colors of the nebulas in this region. Probably about the best I can do with the light pollution I’m dealing with here.
After Such a Good Night Tracking, What’s Next?
Whoo Hoo! I guess we can call this project a success right? Please, I’m just getting started. I know I can do better. So let’s check my notes following this awesome night of shooting.
- Check the wheel rests to see if they could have introduced some movement
- Camera clearance of the wheel platform could be a problem at some angles.
- Find a smoother solution for the altitude adjustment. Works well but sticky.
- In some camera positions, the whole rig might tip over. Maybe a wider base.
- I’m still seeing some play in the load arm, left to right. Maybe try to lock into place.
In general, I couldn’t be more pleased with the results. I have a long way to go though. While I got great results tonight, I get the sense that the whole design is a little finicky and has a very narrow sweet spot of operation. Not sure why that is at the moment, but more testing would be helpful.
Oh, here’s a look at the latest version of the tracker!