

I’ve been using the RedCat 51 telescope for about a year now as part of my go-to imaging system. It’s an easy-to-use and very forgiving piece of equipment that delivers very nice results. If I had one nit to pick at this stage of my hobby, it would be that I’ve found it difficult to maintain good focus throughout an imaging session. The telescope isn’t really to blame here, as this is mostly a function of temperature shift. However, the helical style focuser on the RedCat 51 makes it challenging to really dial in critical focus repeatedly throughout the night. I mean, it’s possible, but it’s a lot of wasted time that I’d really rather spend imaging. So, to cut right to the chase, I set out to design a slim-profile DIY focuser for the RedCat 51 telescope.
Starting with Low-Tech Enhancements
Before diving into an overview of my first attempt at a slim focuser for the RedCat 51, it’s important to mention that there are low-tech options to at least improve the focusing experience. I started by swapping out the Bahtinov mask that came with the RedCat 51 telescope for a custom Bahtinov mask that I had made following the process described in a previous post. Then I designed a simple manual focuser to sit underneath the telescope. This design rotates the helical focuser using a worm gear, which yields increased precision in my focus movements.
I ran with these enhancements for about 6 months and was very pleased with the results. But as I mentioned, the telescope would only hold critical focus for a short while. Once the temperature outside started going wonky, so did my focus. Eventually, my frustration with the lather, rinse, repeat cycle of focusing got the better of me. It was time to step up my game.
Always Start with Requirements
The hardest part of starting any project for me is defining my requirements. Collecting a coherent thought can sometimes seem like an exercise in herding cats. I’m the kind of guy who likes to over-engineer things. So when my brain starts cooking, I have to work really hard to force myself to focus on the outcome above all else. I want to build a focuser for my telescope, not a new mount system…
As a side note, I did look at commercially available focusers. I mean, that would be an easy route. But I’m a glutton for punishment and wanted to exercise my brain for this project. Besides, I didn’t want to go down the path of locking myself into a proprietary solution, or, for that matter, spend the money. And you know that there’s nothing like the feeling of building something yourself and seeing it work… Hopefully… So while commercial solutions exist and are certainly good options, I wanted to be the one to customize the heck out of my rig.
I decided to keep my requirements simple, yet challenging.
- The focuser needs to sit underneath the telescope to remain compact.
- The focuser needs to have an ASCOM driver and interface with N.I.N.A.
- The focuser needs to incorporate a temperature probe.
While this doesn’t look like a lot of requirements, there are unique challenges that need to be overcome to bring this project to completion.
High-Level Overview of Functional Requirements
I need to start by saying that this post won’t go into a lot of detail. This is really just an overview of the prototype I developed. There is a lot of learning that will be applied to the final version, as you’ll read below. But I’ll highlight some of the design considerations and give you a glimpse of my experience during testing.
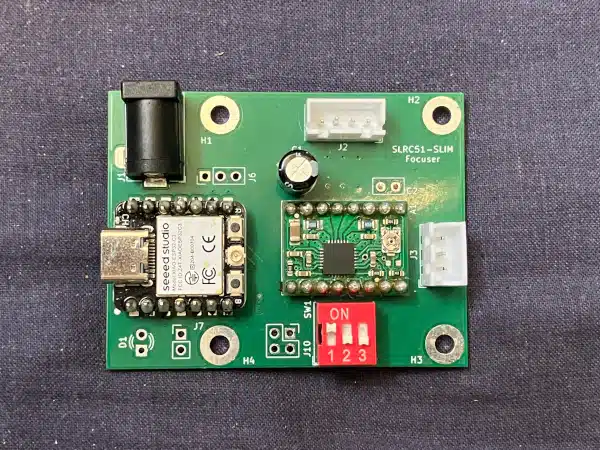
From a hardware perspective, there isn’t much to talk about. I decided to go with an ESP32C3 processor from Seeed Studio. I’ll use this with an A4988 stepper motor driver and a DS18B20 temperature sensor. Finally, for a stepper motor, I acquired a 3.9V, 0.6A, 0.017Nm NEMA 8 motor. Going with a NEMA 8 definitely increased the cost of the project, yet its size was a determining factor in meeting my design requirements. Below, you can see what the electronics look like wired up on a PCB I designed for this project.
The software development was the trickiest part by far for me on this project. I used the ASCOM 7 platform to build a driver, and when I started, I was really out to lunch. However, I took a lot of inspiration and guidance from Dark Sky Geek’s OAG Focuser project. This is a really cool project that helped me get my bearings with the ASCOM Focuser project. I ported some of the code concepts used by Dark Sky Geek to my own driver, and afterwards, I developed my own Arduino code to interface with the driver.
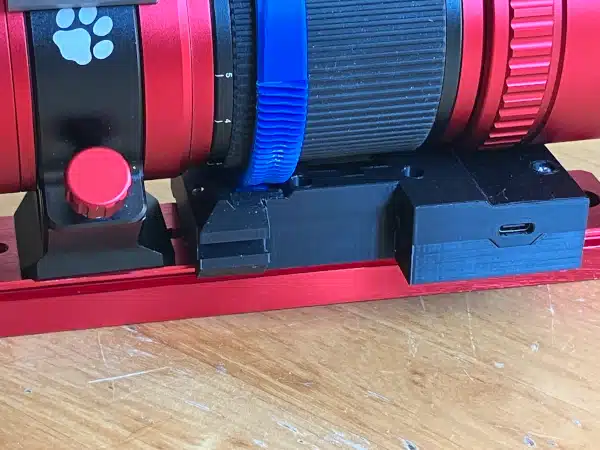
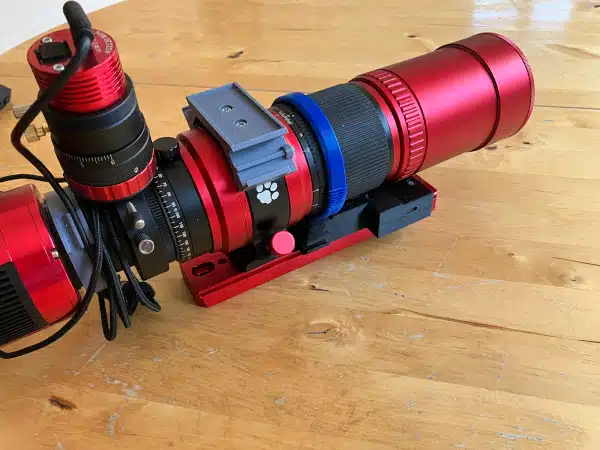
Finally, I designed a mount for the focuser that fits underneath the RedCat 51 that housed a worm gear to drive a ring mounted to the helical focuser. The overall gear reduction is 364:1, which guarantees I’ll have the torque I need to rotate the RedCat 51’s helical focuser. And here’s the picture of the mounted focuser.
 |  |
Setup and Testing
I printed all the necessary gears and parts for the first prototype and soldered up all the electronics. Assembling the focuser was straightforward as I simply refactored the parts as needed on the fly. Mounting the focuser to the telescope also went off without a hitch. I installed my ASCOM driver on my imaging PC and confirmed that N.I.N.A. could recognize it. OK, only one thing left to do… Let’s test it.
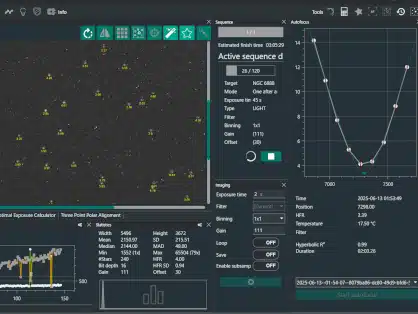
After tweaking the settings a little bit in N.I.N.A., I was able to generate really nice focus curves using the autofocus routine. When using the overshoot method to account for the focuser backlash, I was actually surprised at how well the focuser was able to dial in the image focus. It’s always a bit tense working with something you’ve built before seeing it work for the first time. But after my first night, I’m a happy guy…
In all honesty, I’ve been using this focuser for about 2 months. That’s just to say that I’ve had ample time to put this prototype through its paces. We’re well past kicking the tires on this thing and full stop, this is a viable and reliable focuser. It took me a while to tune in N.I.N.A. as I had to find suitable settings for backlash and imaging that would yield the best results. Here are some screen grabs of the focuser in action within N.I.N.A.
Now that the Dust has Settled…
Having had an extended period to test the focuser, I know all its dirty little secrets. Yes, it works great. But as always, I can do better. So here you can read a bit more about what didn’t well with the Slim RedCat 51 focuser.
- About the backlash… yeah, it’s horrible. The nice thing is that after understanding better how the focus routines in N.I.N.A. work, it’s not really a big problem. However, in the final version, I’ve got some ideas on how to incorporate anti-backlash gears to minimize the issue, which will at least make setting up the focuser a lot easier.
- A whole lotta shakin’ going on – When the stepper motor accelerates and decelerates, there is a hard and clumsy vibration that is, quite frankly, annoying. I know what this is and why it’s happening. Without swamping the discussion here, I’ll simply note that this is a torque ripple problem.
- Foam isolation was not an effective strategy. I thought that adding a 1mm foam pad between the telescope rail and the focuser would help dampen stray vibrations and noise. Well, maybe. But testing didn’t seem to indicate it was even required, and to be honest, I think I’d like that 1mm of space back.
- The driver likes to sit in the back – I haven’t figured this one out yet, but for whatever reason, I need to connect to the mount before connecting to the focuser in N.I.N.A. Otherwise, the driver selects the wrong COM port for connection. I am almost certain this is a coding error on my part. I just haven’t found it yet.
- The temperature circuit is broken. This was a duh moment on my part when designing the PCB that I just need to fix in the next iteration. I ended up blowing up an ESP32C3 when I soldered everything up on the first PCB. So for now, I’ll just leave the temperature probe disconnected.
- Cable madness – Having both USB and 12V power supply cables is a bit of a mess. Perhaps this is something I can simplify.
Next Steps
Well, I’m definitely sold on the idea of having a slim focuser that sits underneath the RedCat51 using the standard telescope shoe. I’m going to start working on an upgrade to this design that will accomplish the following:
- Minimize the focuser footprint (ie. make it smaller)
- Use only 1 cable for both data and power
- Minimize the backlash in the gear train
- Eliminate vibrational noise at low currents
- Bring the BOM cost below $40
So if this project interests you, stay tuned. I expect I’ll be working on this over the coming months.